[Solved] Displaying images, various formats
-
Thanx for your help
Unfortunately it does not work for me
instead of

Does not even work with pushImage
Are they parameters/arguments I should use? -
In this file there is no simply an array containing each color component R, G, B for each subsequent pixel. The color code is expressed by a total of 16 bits: red 5 bits, green 6 bits and blue 5 bits from the top. In this case a color of one pixel is represented as a two values like [0xff,0xff, ...
You must include this file with include directive and use name codeimage of this array as a parameter of function:
M5.Lcd.drawBitmap(0,0,320, 240, codeimage);
This file is concatenated with your code when compiling the program. And it is downloaded as a whole program to the device.
You also try a .drawBmpFile() function or .drawJpgFile() to draw files directly from your device flash
https://github.com/m5stack/m5-docs/blob/master/docs/en/api/lcd.md
-
@robalstona
Thanx for your help
I added the c file in the arduino IDE, that's how it's done in the example Factory Test
It DOES work with the exemple (M5 logo) where the c file is given, that's why I suppose my problem is about converting jpg/bmp -> c file
There are a lot of converters out there, none gave me a c file that could be correctly displayed with drawBitmap -
Jpg and bmp images require some specific formatting but they are usable direct in code if the image is uploaded to the cores memory, for examples on this please search the forum as I did work hard to find out the exact specification the file has to be in.
-
Believe me I did search...the forum and many other places...At the moment I'm trying to "reverse engineer" the only c filethat is working
-
Well...using only 320x240 input and "ImageToCode" converter it seems to be OK not always but most of the time
Thanks for your help -
maybe you try open your image in image editor and save it with 16bit color BMP (not 24bit) before use program to convert
-
@f3l1x I know this is an OLD topic listed as solved but I came across it having the same issue. I didn't feel it was actually solved so I wanted to chime in with what I found.
First in the M5Stack.h it lists an RGBBitmap function but that isn't actually available. You can push an RGB bitmap just using M5.Lcd.drawBitmap though.
Getting a BMP converted to the appropriate code took a bit of work to find a format that made the Ardunio ide happy but here is what I found.
If you are using a monochrome image and image2cpp you want to use the Arduino code output format and the draw mode as Horizontal - 2 bytes per pixel(565). The 565 is the RGB format that is required. If you use that format the image will be defined using a const uint16_t which will work just fine.
https://javl.github.io/image2cpp/For a color image you will need to use something else. I ended up going with https://sourceforge.net/projects/lcd-image-converter/ but do a search and find something that is right for you. The trick here again comes down to the options and format. I used Color scanning from Top to Bottom and in the forward direction. Again it is important to use the R5G6B5 preset to make sure the hex is proper for the code. Also make sure to use 16bit block size. 16bit isn't needed for BW or monochrome images but still can be used at the expensive of more memory. If you are using 16bit for BW images you will see this 0x0000, 0xffff. 8 bit would suffice for those leaving you with 2 less characters.
When you are using a color bmp then 16 bit is needed. You will still have the same number of characters but will see something more like this 0xf7be, 0xef7d, 0xdefc, Each represents a color and I found that 16bit was needed for what I was doing.
Some other points of contention. Some of the image converters and examples will use different variable types. For the drawBitmap I found that it wanted the file as a "short" (as per some of the examples) or uint16_t. If you get an error just look at what the function is expecting to see.
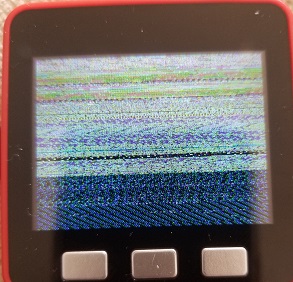
The image you displayed with the funky colors I found to happen when the width and height values in drawBitmap don't match the actual bitmap. If your image is 32 x 32 (1024 pixels), then your call to drawBitmap should match that. If it doesn't you will see the result you are looking for. I haven't found a good way to scale things in the code but hopefully that will get someone else who comes across this ancient thread a point in the right direction.
Also for whatever its worth it is much easier to call the images from SD than to go through all this hassle unless you have a good reason for it. This process took way longer to figure out than I would have liked which is why I wanted to respond. I have done this before on monochrome displays without issues but the color bmp on the M5 gave me a headache:)
hope it helps.
-
Nice work.
Can you write up a guide to Using images on Hackster.io based on what you found as it would be easier to find instead of searching this forum in the future. -
@ajb2k3 Sure, I am still learning and figuring a few things out so I want to explore all options first before I write anything other than a forum reply. I plan to make a few videos of it on my YT channel. I cover mostly CAD topics but have a GPS speedo using sprites and was exploring using BMPs. https://youtu.be/SUAqVUN9AuQ
-
@shift1313
Thanks for doing this work. I failed 50 million times, but your tutorial was spot on for images. -
Hello@F3l1x
In the example below I am using lcd-image-converter.
lcd-image-converter
https://sourceforge.net/projects/lcd-image-converter/
Select 8bit or 16bit for Block size and create xxx.c.
Use M5.Lcd.pushImage(x,y,imgWidth,imgHeight,(unit16_t *) xxx);M5Stack Community :
M5StickC Nixie tube Clock ( 2019.06.06 )
https://forum.m5stack.com/topic/1087/m5stickc-nixie-tube-clockOriginal text:
M5StickC Nixie tube Clock
https://macsbug.wordpress.com/2019/06/06/m5stickc-nixie-tube-clock/UIFlow:( jpg )
@world101 implemented a Nixie tube clock in the uiFlow IDE for M5 Stick C-Plus devices.
https://github.com/bstein2379/M5StickC-Plus-Nixie-clockReference material:
M5STICKC's DISPLAY analysis part 3 drawn know -how
https://lang-ship.com/blog/work/m5stickc-display3-m5lcd/Lang-ship's image code conversion site :
https://lang-ship.com/tools/image2data/
Hello! It looks like you're interested in this conversation, but you don't have an account yet.
Getting fed up of having to scroll through the same posts each visit? When you register for an account, you'll always come back to exactly where you were before, and choose to be notified of new replies (either via email, or push notification). You'll also be able to save bookmarks and upvote posts to show your appreciation to other community members.
With your input, this post could be even better 💗
Register Login