Control the joint on myCobot 280 in Python
-
For a serial multi-joint robot, the using of the joint on myCobot 280 is to control the variables of each joint to make each joint reaches a target position at a certain speed.
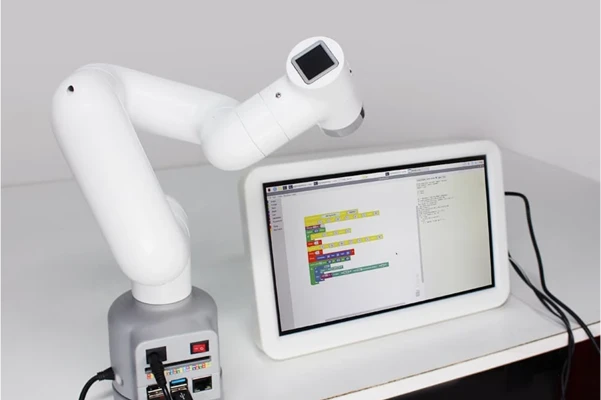
A typical robotic arm geometry consists of the waist, shoulders, elbows, and wrists, corresponding to the human arm joints. And each joint has its Degree of Freedom (DOF). The arm is fully-actuated with each DOF achieved by a precise servo motor. Also, with the help of end effectors, a robotic arm can be flexible in object manipulation.
So how to program the myCobot to control its joint in Python? Here are the examples we made, let's take a look!
For Single-joint control
1、send_angle(id, degree, speed)
Function: to sends a specified single joint motion to a specified angle.
Description of parameters:
id: to stand for the joints of a robot arm. Six axis means that the robot arm has six joints, and four-axis means it has four joints. There are specific representation methods therefor.The method to represent the joint 1:Angle.J1.value. (It can also be represented by numbers 1-6.)
degree: means the angle of a joint.
speed: means the movement speed of the robot arm, ranging from 0 to 100.
Return value: None2、
set_encoder(joint_id, encoder)
Function: to sends a specified single joint motion to a specified potential value.
Description of parameters:
joint_id: to stand for the joints of a robot arm. Six axismeans that the robot arm has six joints, and four-axis means it has four joints. There are specific representation methods therefor. The method to represent the joint 1:` Angle.J1.value`. (It can also be represented by numbers 1-6.) encoder:means the potential value of the robot arm, ranging from 0 - 4096.Return value: None
For Multi-joint control
1、get_angles()
Function: to get the angels of all joints.
Return value: List: a list of floating point values which represent the angles of all joints2、
send_angles(degrees, speed)
Function: to send all angles to all joints.
Description of parameters:
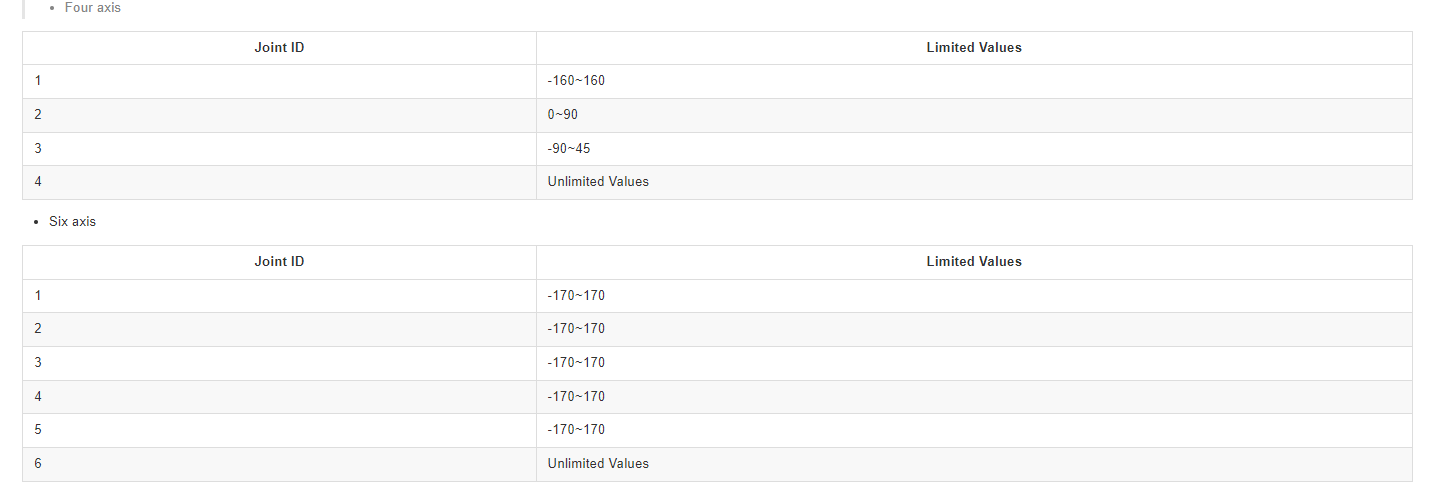
degrees: (List [float]) contains the angles of all joints. A six-axis robot has six joints, so the length is 6; and the four-axis length is 4. The representation method is [20, 20, 20, 20, 20, 20]; value range: about -170 - 170. Each joint of the four-axis robot is different. See the table above for details.
speed: means the movement speed of the robot arm, ranging from 0 to 100.
Return value: None
3、set_encoders(encoders, sp)
Function: Send potential values to all joints of the robotic arm.
Description of parameters:
encoder: means the potential of the robot arm, ranging from 0 - 4096. Six axis length is 6, and four axis length is 4. The way to represent:[2048, 2048, 2048, 2048, 2048, 2048].
sp: means the movement speed of the robot arm, ranging from 0 to 100.
Return value: None
4、sync_send_angles(degrees, speed, timeout=7)
Function: to send an angle synchronously; return when reaching a target point.
Description of parameters:
degrees: A list of angle values of each jointList[float].
speed: (int) means the movement speed of the robot arm, ranging from 0 to 100.
timeout: The default time is 7s.
5、get_radians()
Function: to get the radian of all joints.
Return value: list: a list containing radian values of all joints.
6、
send_radians(radians, speed)
Function: to send radian values to all joints.
Description of parameters:
radians: means the radian values of the robot arm, ranging from -5 to 5.
Return value:list: a list containing radian values of all joints.Note: When setting the Angle, different mechanical arms have different corresponding values.
We also provide the related cases for you:
Single-joint motionfrom pymycobot.mycobot import MyCobot from pymycobot.genre import Angle import time # MyCobot class initialization requires two parameters: # The first is the serial port string, such as: # linux: "/dev/ttyUSB0" # or "/dev/ttyAMA0" # windows: "COM3" # The second is the baud rate: # M5 version is: 115200 # # Example: # mycobot-M5: # linux: # mc = MyCobot("/dev/ttyUSB0", 115200) # or mc = MyCobot("/dev/ttyAMA0", 115200) # windows: # mc = MyCobot("COM3", 115200) # mycobot-raspi: # mc = MyCobot(PI_PORT, PI_BAUD) # # Initialize a MyCobot object # Create object code for Raspberry Pi # mc = MyCobot(PI_PORT, PI_BAUD) # Create object code for M5 mc=MyCobot('COM3',115200) # Robotic arm recovery mc.send_angles([0, 0, 0, 0, 0, 0], 40) time.sleep(3) # Control joint 3 to move 70° mc.send_angle(Angle.J3.value,70,40) time.sleep(3) # Control joint 4 movement -70° mc.send_angle(Angle.J4.value,-70,40) time.sleep(3) # Control joint 1 to move 90° mc.send_angle(Angle.J1.value,90,40) time.sleep(3) # Control joint 5 movement -90° mc.send_angle(Angle.J5.value,-90,40) time.sleep(3) # Control joint 5 to move 90° mc.send_angle(Angle.J5.value,90,40) time.sleep(3)Video Demo:
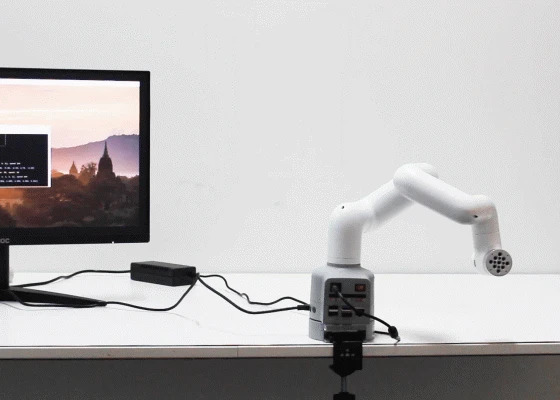
Operation of control the single-jointMulti-joint motion
import time
from pymycobot import MyCobot
# MyCobot class initialization requires two parameters:
#   The first is the serial port string, such as:
#       linux: "/dev/ttyUSB0"
#          or "/dev/ttyAMA0"
#       windows: "COM3"
#   The second is the baud rate::
#       M5 version is: 115200
#
#    Example:
#       mycobot-M5:
#           linux:
#              mc = MyCobot("/dev/ttyUSB0", 115200)
#          or mc = MyCobot("/dev/ttyAMA0", 115200)
#           windows:
#              mc = MyCobot("COM3", 115200)
#       mycobot-raspi:
#           mc = MyCobot(PI_PORT, PI_BAUD)
#
# Initialize a MyCobot object
# Create object code for Raspberry Pi
# mc = MyCobot(PI_PORT, PI_BAUD)
# Create object code for M5
mc=MyCobot('COM3',115200)

# Robotic arm recovery
mc.send_angles([0, 0, 0, 0, 0, 0], 50)
time.sleep(2.5)

# Control different angles of rotation of multiple joints
mc.send_angles([90,45,-90,90,-90,90],50)
time.sleep(2.5)

# Return the robotic arm to zero
mc.send_angles([0,0,0,0,0,0],50)
time.sleep(2.5)

# Control different angles of rotation of multiple joints
mc.send_angles([-90,-45,90,-90,90,-90],50)
time.sleep(2.5)
Video Demo:
Operation of control the multi-jointAfter running the code, we will see the motion state of the myCobot joint.
Please note that before running this function, we should build the Python environment first. These cases can be applied to myCobot 280-M5, PI, and Jetson.
Hope that you can get help in our sharing, you can also find more details on our official website and store.
Hello! It looks like you're interested in this conversation, but you don't have an account yet.
Getting fed up of having to scroll through the same posts each visit? When you register for an account, you'll always come back to exactly where you were before, and choose to be notified of new replies (either via email, or push notification). You'll also be able to save bookmarks and upvote posts to show your appreciation to other community members.
With your input, this post could be even better 💗
Register Login