AI Robotic Arm Plays Connect4:Who will Win!
-
In the previous article, we delved into the creation of a cerebral apparatus capable of conducting the Connect 4 game. We briefly introduced various gaming algorithms such as the minimax algorithm, Alpha-Beta pruning algorithm, among others. However, the most crucial algorithm nowadays is the neural network algorithm and deep learning. The neural network algorithm allows computers to think like humans by setting unique environments for learning connect4. In this article, we will further explore how to implement the idea of a robotic arm playing connect4. In other words, an AI mechanical arm that can play the game of connect4. If you are interested, I would recommend reading the previous article.
Introduction
The following content is mainly divided into four sections for introduction:
● Information acquisition: The chessboard information is obtained through the camera to conduct the game.
● Information processing: The acquired information is processed to identify the position of the connect4 pieces. Through the gaming algorithm, the next step of the connect4 piece is calculated.
● Robotic arm trajectory: The design of how the mechanical arm can grasp the connect4 pieces and the path of placing the connect4 pieces.
● Integration of functions: The above three functions are combined to achieve AI robotic arm connect4 playing.

Let see together!Process
Information acquisition
Environment: Python,OpenCV the lastest,numpy
To begin with, the acquisition of chessboard information is necessary, which includes the chessboard itself and the pieces on it. We utilize the OpenCV library's method cv2.aruco.ArucoDetector(dictionary, parameters) to detect the Aruco QR codes, which marks the position of the Aruco from an image and calculates the position and posture information. This will allow us to determine the entire chessboard's position, including the location of the four corners.
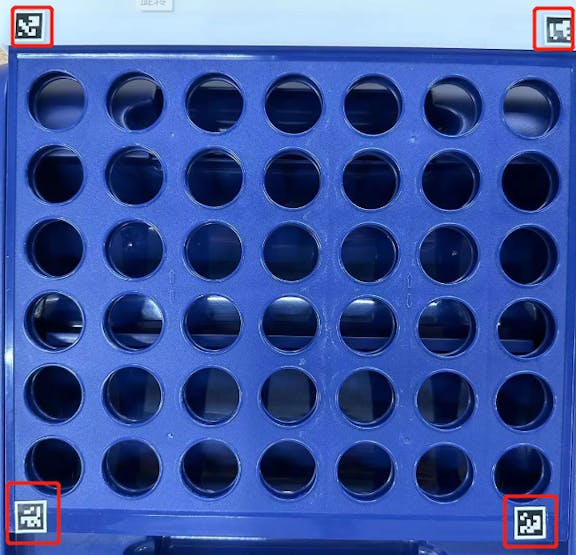
Code: The code uses the cv2.aruco.ArucoDetector(dictionary, parameters) method to determine the position of our board.dictionary = cv2.aruco.getPredefinedDictionary(cv2.aruco.DICT_6X6_250) parameters = cv2.aruco.DetectorParameters() detector = cv2.aruco.ArucoDetector(dictionary, parameters) corners, ids, rejectedCandidates = detector.detectMarkers(bgr_data) rvec, tvec, _ = cv2.aruco.estimatePoseSingleMarkers(corners, 0.05, self.mtx, self.dist) if rvec is None or len(corners) != 4: return None # debug if DEBUG: debug_img = bgr_data.copy() for i in range(rvec.shape[0]): cv2.drawFrameAxes(debug_img, self.mtx, self.dist, rvec[i, :, :, ], tvec[i, :, :, ], 0.03) # Draw a square around the marker. cv2.aruco.drawDetectedMarkers(debug_img, corners) cv2.imshow("debug1", debug_img) # Sort the detected QR code corner points in the following order: top left, top right, bottom left, bottom right. corners = np.mean(corners, axis=2) corners = (np.ceil(corners)).astype(int) corners = corners.reshape((4, 2)) cx, cy = (np.mean(corners[:, 0]), np.mean(corners[:, 1])) res: list = [None for _ in range(4)] for x, y in corners: if x < cx and y < cy: res[0] = (x, y) elif x > cx and y < cy: res[1] = (x, y) elif x < cx and y > cy: res[2] = (x, y) else: res[3] = (x, y) res = np.array(res) ## debug code if DEBUG: debug_img = bgr_data.copy() for p in res: cv2.circle(debug_img, p, 3, BGR_GREEN, -1) cv2.imshow("aruco", debug_img) return resOnce the chessboard is determined, we can assign different colors to represent the connect4 pieces. For a clearer distinction, we will use two highly contrasting colors, red and yellow, and label them accordingly.

We will set a logical sequence wherein every time a new connect4 piece is added to the board, the current state of the chessboard data will be passed on to the gaming algorithm to determine the next move.Information processing
As previously mentioned, we have acquired the data of the chessboard. The next step is to pass this information to the gaming algorithm to predict the location of the next connect4 piece.
Here is the pseudocode for the processing:function model_predict(state, available_actions): # Convert available_actions to numpy array available_actions = np.array(available_actions) # Extend the state to meet the input requirements of the ONNX model state = np.expand_dims(np.expand_dims(np.array(state, dtype=np.float32), axis=0), axis=0) # Build the input of the ONNX model ort_inputs = {self.policy_net.get_inputs()[0].name: state} # Make model predictions and get the predicted value for each available location r_actions = self.policy_net.run(None, ort_inputs)[0][0, :] # Select the optimal drop position according to the predicted value state_action_values = np.array( [r_actions[action] for action in available_actions]) argmax_action = np.argmax(state_action_values) greedy_action = available_actions[argmax_action] return greedy_actionThe main logic of this method is to use ONNX models for model prediction and select the optimal connect4 piece location based on the predicted results. Firstly, the available locations, which are stored as available_actions, are converted into numpy arrays. Then, the current game state, state, is expanded to meet the input requirements of the ONNX model. The expanded state is then passed to the ONNX model for prediction, and the predicted results are stored in the r_actions variable. Afterwards, based on the predicted results and available move locations, the predicted value of each available location is calculated. The location with the highest predicted value is selected as the optimal connect4 piece location and returned.
Robotic Arm trajectory
Now that we have both the brain (gaming algorithm) and eyes (recognition algorithm), all we need is a hand to execute the actions. We will use the Python library pymycobot to control the mechanical arm. Due to the nature of the chessboard, the connect4 pieces can only be dropped from above. By assigning a coordinate point for each connect4 piece in each column, we can plan the trajectory of the mechanical arm. As the chessboard is relatively clean without any obstructions, we do not need to consider too many path factors.
Code:# Initialize and define several coordinate points # Set a list of length 7 self.chess_table = [None for _ in range(7)] self.chess_table[0]-[6] = [J1,J2,J3,J4,J5,J6] # seven positions self.angle_table = { "recovery": [0, 0, 0, 0, 0, 0], #initial position "observe": [-2.54, 135.0, -122.95, -32.34, 2.46, -90.35],#observation position "stack-hover-1": [-47.19, -37.96, -58.53, 1.05, -1.93, -1.84],#Pick up the position of the pieces }Next, introduce some methods of controlling the robotic arm in pymycobot:
#Sending the angle to the robotic arm.
self.send_angles(self.chess_table[n], ARM_SPEED)

#Sending the Cartesian coordinates to the robotic arm.
self.send_coords(coord_list,ARM_SPEED)
Integration of functions
Before integrating the function points, we have to sort out the logic between them.
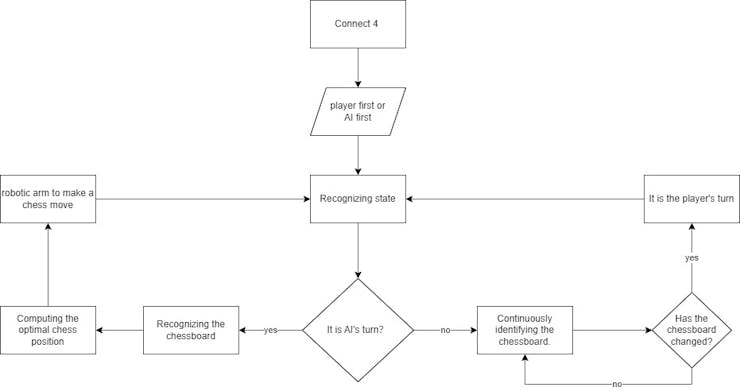
With the flow chart of playing connect4, the next step is to combine the function points together.
This is the structure file of the program.
├── Agent.py The logic of the robotic arm's gameplay.
├── ArmCamera.py Camera control.
├── ArmInterface.py Robotic Arm control
├── Board.py Data structure of the chessboard and related judgments.
├── CameraDemo.py Small program for testing camera performance.
├── config.py Utilized to define specific configuration details.
├── Detection.py Machine vision recognition.
├── dqn.pt Neural network model file, used to implement gameplay logic.
├── main.py main program.
├── StateMachine.py A state machine.
The specific codes are not shown here one by one, let's watch a video to see how they perform.
video address:https://youtu.be/uq35EdptpAkSummary
Theoretically speaking, it is nearly impossible for anyone to win against the machine. This is because the algorithm used by the machine can predict several steps ahead and even more, while an average person can only predict two or three steps ahead at most. However, based on the videos we have seen, the AI has only won one game, and lost the other due to structural issues. The chessboard was supposed to be in one location, but was forced to another.
Do you find this project interesting? We will continue to improve the Connect4 game suite and make it available on our website. If you are interested, please follow us for updates.
Would you like to try implementing other chess games using the mechanical arm, such as chess or Chinese chess? Keep in mind that different chess games use different algorithms. We welcome you to share your thoughts with us in the comments section. -
Just one issue.
You have chess instead of Connect4 multiple times throughout the guide which is confusing
-
@ajb2k3 I deeply apologize for the error. I was attempting to find a suitable term to encompass all board games, and had considered using "board games" but found it to be inadequate. I have now revised it to exclusively refer to Connect4.
Hello! It looks like you're interested in this conversation, but you don't have an account yet.
Getting fed up of having to scroll through the same posts each visit? When you register for an account, you'll always come back to exactly where you were before, and choose to be notified of new replies (either via email, or push notification). You'll also be able to save bookmarks and upvote posts to show your appreciation to other community members.
With your input, this post could be even better 💗
Register Login