EchoActions: Connecting thougths and Robotic Arm M5Stack

-
This article is edited and reprinted with authorization from the author, kimizuka.
Original article link: https://blog.kimizuka.org/entry/2024/02/01/141808

Introduction
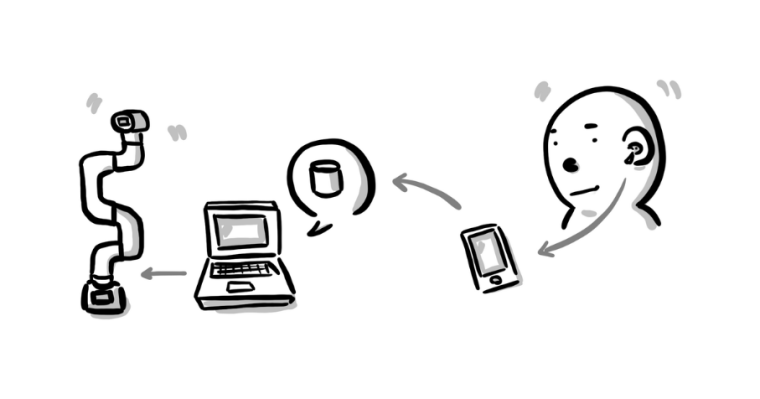
Translate AirPods through the iPhone app to Express, then through python-shell to pymycobot, and finally synchronize with myCobot to synchronize the rotation angle of AirPods with the posture of myCobot 🤖.
Although it's unclear if there's a demand, I will provide a rough outline of the source code.Project Structure
This project primarily employs technologies such as headphone-motion, web servers, the express framework of node.js, python-shell, and pymycobot. Here is a brief introduction to these technologies:
1.Headphone-Motion: Headphone Motion is a project that utilizes specific technology to track and utilize user head movements. Although the specifics may depend on the implementation method and platform used (such as iOS), it mainly demonstrates how to capture head movement data by connecting to the device's headphones (especially those smart headphones with built-in sensors). A more intuitive effect of this can be seen in the Headphone Motion Unity Plugin made by GitHub user anastasiadeana. It is capable of real-time tracking of the user's head movements, including tilting and rotating, which is a core technology of this project.

2.Web Server: There are many types of servers, which provide data, services, or applications to other applications or devices. Servers perform tasks such as processing data requests, hosting websites, storing information, running business applications, and so on. In this project, the web server mainly handles receiving head movement data from the iOS application and passing these data to the script controlling the mycobot robot arm.3.Express-Node.js: Express is a fast, open, minimalistic web application framework for Node.js. It is designed for building web applications and APIs. It allows developers to set up middleware to respond to HTTP requests in a very fast and simple way, making the development of web applications quicker and easier.
https://github.com/expressjs/express4.Pymycobot-Python: pymycobot is a Python library specifically designed for controlling the myCobot robot arm. This library provides a series of functions and interfaces that allow developers to communicate and control the myCobot robot arm directly through Python scripts. Using pymycobot, developers can write code to control the robot arm's movements, adjust its posture, execute preset action sequences, etc., making it widely applicable in education, research, automation, and more.
iOS App
This application is based on an app I created previously, utilizing react-native-headphone-motion to access the sensors in AirPods through a React Native iOS application.
It's an interesting project where, when you are detected bending your head down for a long time while wearing AirPods, a lamenting sound will remind you.
https://twitter.com/i/status/1745588902981931443
https://blog.kimizuka.org/entry/2024/01/16/105208One point to note is the change I made: I added a process to send POST requests to the web server in onDeviceMotionUpdates. Additionally, to avoid overburdening the server with POST requests on every update, I set it up to send a request at a minimum interval of 500ms.
App.tsx
useEffect(() => {
  const delay = 500;
  const handleDeviceMotionUpdates = onDeviceMotionUpdates((data) => {
     // If the time since the last request is less than 500ms, return
    if (Date.now() - lastUpdateTimeRef.current < delay) {
      return;
    }

    // Post sensor values to the Web server
    axios.post(String(process.env.API_URL), {
      pitch: data.attitude.pitchDeg || 0,
      roll: data.attitude.rollDeg || 0,
      yaw: data.attitude.yawDeg || 0
    }).then(() => {
      lastUpdateTimeRef.current = Date.now();
    }).catch((err) => {
      console.error(err);
      lastUpdateTimeRef.current = Date.now();
    });

    setPitch(data.attitude.pitch);
    setPitchDeg(data.attitude.pitchDeg);
    setRoll(data.attitude.roll);
    setRollDeg(data.attitude.rollDeg);
    setYaw(data.attitude.yaw);
    setYawDeg(data.attitude.yawDeg);
    setGravityX(data.gravity.x);
    setGravityY(data.gravity.y);
    setGravityZ(data.gravity.z);
    setRotationRateX(data.rotationRate.x);
    setRotationRateY(data.rotationRate.y);
    setRotationRateZ(data.rotationRate.z);
    setUserAccelerationX(data.userAcceleration.x);
    setUserAccelerationY(data.userAcceleration.y);
    setUserAccelerationZ(data.userAcceleration.z);
  });

  return () => {
    handleDeviceMotionUpdates.remove();
  };
}, []);
In the POST request, I used axios, which can send asynchronous HTTP requests to REST endpoints and handle responses.
Therefore, it's also necessary to add module imports.import axios from 'axios';Code
import axios from 'axios'; // Added to simplify the POST request
import React, {
  useEffect,
  useRef, // Added to maintain a 500ms interval
  useState,
} from 'react';
import {Button, SafeAreaView, StyleSheet, Text} from 'react-native';
import {
  requestPermission,
  onDeviceMotionUpdates,
  startListenDeviceMotionUpdates,
  stopDeviceMotionUpdates,
} from 'react-native-headphone-motion';

const API_URL = 'http://localhost:3000'; // Fill in the URL to POST

export default function App() {
  const lastUpdateTimeRef = useRef<number>(0); // Added to keep track of the last update time
  const [pitch, setPitch] = useState(0);
  const [pitchDeg, setPitchDeg] = useState(0);
  const [roll, setRoll] = useState(0);
  const [rollDeg, setRollDeg] = useState(0);
  const [yaw, setYaw] = useState(0);
  const [yawDeg, setYawDeg] = useState(0);
  const [gravityX, setGravityX] = useState(0);
  const [gravityY, setGravityY] = useState(0);
  const [gravityZ, setGravityZ] = useState(0);
  const [rotationRateX, setRotationRateX] = useState(0);
  const [rotationRateY, setRotationRateY] = useState(0);
  const [rotationRateZ, setRotationRateZ] = useState(0);
  const [userAccelerationX, setUserAccelerationX] = useState(0);
  const [userAccelerationY, setUserAccelerationY] = useState(0);
  const [userAccelerationZ, setUserAccelerationZ] = useState(0);

  useEffect(() => {
    const delay = 500; // Store the update interval in a variable
    const handleDeviceMotionUpdates = onDeviceMotionUpdates(data => {
      if (Date.now() - lastUpdateTimeRef.current < delay) {
        // Return if the update interval is not met
        return;
      }

      // Post sensor values to the Web server
      // Update lastUpdateTimeRef regardless of success or failure
      // For some reason, await was not used
      axios
        .post(String(API_URL), {
          pitch: data.attitude.pitchDeg || 0,
          roll: data.attitude.rollDeg || 0,
          yaw: data.attitude.yawDeg || 0,
        })
        .then(() => {
          lastUpdateTimeRef.current = Date.now();
        })
        .catch(err => {
          console.error(err);
          lastUpdateTimeRef.current = Date.now();
        });

      setPitch(data.attitude.pitch);
      setPitchDeg(data.attitude.pitchDeg);
      setRoll(data.attitude.roll);
      setRollDeg(data.attitude.rollDeg);
      setYaw(data.attitude.yaw);
      setYawDeg(data.attitude.yawDeg);
      setGravityX(data.gravity.x);
      setGravityY(data.gravity.y);
      setGravityZ(data.gravity.z);
      setRotationRateX(data.rotationRate.x);
      setRotationRateY(data.rotationRate.y);
      setRotationRateZ(data.rotationRate.z);
      setUserAccelerationX(data.userAcceleration.x);
      setUserAccelerationY(data.userAcceleration.y);
      setUserAccelerationZ(data.userAcceleration.z);
    });

    return () => {
      handleDeviceMotionUpdates.remove();
    };
  }, []);

  return (
    <SafeAreaView style={styles.container}>
      <Button
        title={'requestPermission'}
        onPress={async () => {
          await requestPermission();
        }}
      />
      <Button
        title={'startListenDeviceMotionUpdates'}
        onPress={async () => {
          await startListenDeviceMotionUpdates();
        }}
      />
      <Button
        title={'stopDeviceMotionUpdates'}
        onPress={async () => {
          await stopDeviceMotionUpdates();
        }}
      />
      <Text>{lastUpdateTimeRef.current}</Text>
      <Text>{`pitch: ${pitch}`}</Text>
      <Text>{`pitchDeg: ${pitchDeg}`}</Text>
      <Text>{`roll: ${roll}`}</Text>
      <Text>{`rollDeg: ${rollDeg}`}</Text>
      <Text>{`yaw: ${yaw}`}</Text>
      <Text>{`yawDeg: ${yawDeg}`}</Text>
      <Text>{`gravityX: ${gravityX}`}</Text>
      <Text>{`gravityY: ${gravityY}`}</Text>
      <Text>{`gravityZ: ${gravityZ}`}</Text>
      <Text>{`rotationRateX: ${rotationRateX}`}</Text>
      <Text>{`rotationRateY: ${rotationRateY}`}</Text>
      <Text>{`rotationRateZ: ${rotationRateZ}`}</Text>
      <Text>{`userAccelerationX: ${userAccelerationX}`}</Text>
      <Text>{`userAccelerationY: ${userAccelerationY}`}</Text>
      <Text>{`userAccelerationZ: ${userAccelerationZ}`}</Text>
    </SafeAreaView>
  );
}

const styles = StyleSheet.create({
  container: {
    flex: 1,
    alignItems: 'center',
    justifyContent: 'center',
    backgroundColor: 'white',
  },
});
Actually, it would be more convenient to specify the API_URL directly in the application, but I implemented it this way considering speed.
Web Server
I set up a local server on my Mac. To operate myCobot, I went through several setup steps, mainly to adapt to Mac computers. These steps included installing drivers for the robot arm, updating the firmware of mycobot 280, and other operations, all detailed in this article.
https://blog.kimizuka.org/entry/2021/08/10/131812
I think creating a web server with Python would be smoother, but based on my skill set, using Node.js is the fastest method. So, I plan to quickly set up the server using Express. Communication with myCobot is conducted through Python, so for this part, I decided to use python-shell to implement it.require('dotenv').config(); // Used to pass the port of myCobot from outside const express = require('express'); const { PythonShell } = require('python-shell'); // Used for communicating with myCobot const app = express(); const http = require('http').Server(app); const duration = 100; // If the delay (500ms) set on the application side is too small, it will cause problems app.use(express.json()); app.post('/', (req, res) => { try { const angles = [0, 0, 0, 0, 0, 0]; // For myCobot's joint information, refer to page 13 of https://www.elephantrobotics.com/wp-content/uploads/2021/03/myCobot-User-Mannul-EN-V20210318.pdf // The array stores the 6 joints in order from the bottom up // Each joint has a definite range of motion; ensure not to exceed this range angles[0] = Math.max(-90, Math.min(req.body.yaw || 0, 90)); // J1 angles[3] = Math.max(-90, Math.min(req.body.pitch || 0, 90)); // J4 angles[5] = Math.max(-175, Math.min(req.body.roll || 0, 175)); // J6 // myCobot connected via USB receives instructions from Python PythonShell.runString( `from pymycobot.mycobot import MyCobot; MyCobot('${ process.env.MY_COBOT_PORT }').send_angles([${ angles }], ${ duration })`, null, (err) => err && console.error(err) ); } catch (err) { console.error(err); } res.send(200); }); try { const angles = [0, 0, 0, 0, 0, 0]; // Resets posture at startup PythonShell.runString( `from pymycobot.mycobot import MyCobot; MyCobot('${ process.env.MY_COBOT_PORT }').send_angles([${ angles }], ${ duration })`, null, (err) => err && console.error(err) ); } catch(err) { console.error(err); } http.listen(3000, '0.0.0.0');Because it's necessary to execute pymycobot through PythonShell, the pymycobot directory must be placed at the same level as app.js.
https://github.com/elephantrobotics/pymycobot
Once everything is prepared and the PC is connected to myCobot,
you can start the web server and pass the pitch, roll, and yaw values received through POST requests to myCobot.
Although this time the sensor values of AirPods are sent from an iPhone application via POST, the source of the POST could be from anywhere. Therefore, I think setting up such a server could be potentially useful in the future.source code:
https://github.com/kimizuka/mycobot-express/tree/example/airpodsSummary
This project showcases the integration of headphone motion detection with robotic control, illustrating the potential of combining human movement data with robotics. By capturing head motion through smart headphones and translating it into commands for a robotic arm, it enhances human-robot interaction and introduces innovative applications in automation and assistive technologies. This approach opens up new avenues for intuitive control mechanisms in robotics, making technology more accessible and interactive.
Finally, thanks again to Kimizuka for sharing this case with us.Feel free to explore further or share your insights with us.
Hello! It looks like you're interested in this conversation, but you don't have an account yet.
Getting fed up of having to scroll through the same posts each visit? When you register for an account, you'll always come back to exactly where you were before, and choose to be notified of new replies (either via email, or push notification). You'll also be able to save bookmarks and upvote posts to show your appreciation to other community members.
With your input, this post could be even better 💗
Register Login