Coffee Roasting Glasses based on M5Stack AtomS3 (Part1)
-
Coffee Roasting Glasses based on M5Stack AtomS3
I. Project Description
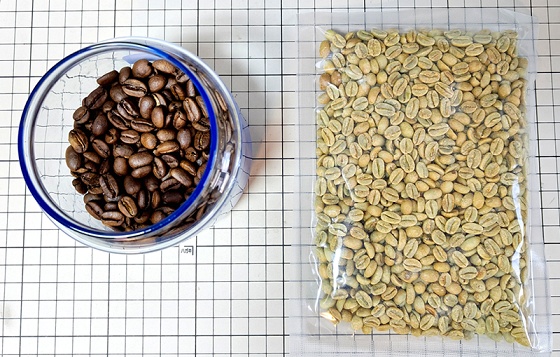
I am an enthusiast of both coffee and electronics, and roasting coffee beans is one of my joys. M5STACK brings these two hobbies of mine together, resulting in this interesting project: "The Making of Coffee Bean Roasting Glasses".
Description:
Coffee bean roasting glasses allow the user to monitor the temperature, temperature rise rate, and time of coffee beans in real-time during roasting.
The entire project consists of three parts: Part A (Front-end Data Acquisition and Transmission Terminal), which collects the bean temperature from the roaster in real-time and sends the data via ESP-NOW to Part B (The Roasting Glasses, i.e., the Reception and Display Terminal). The roasting glasses enable the user, during the coffee bean roasting process, to monitor the real-time temperature, temperature rise per minute, and time via a head-mounted device while tending to the roaster. This allows for more efficient and accurate coffee bean roasting. While enjoying the DIY process using M5STACK modules, you also create a delicious batch of coffee beans. Part C is the "PC Software + Thermal Printer". Software running on a PC can record the entire roasting process, providing foundational data for subsequent analysis and improvement of your roasting techniques. The thermal printer can promptly print labels for marking the coffee bean containers.II. Photos and/or Video Demonstration


III. Instructions
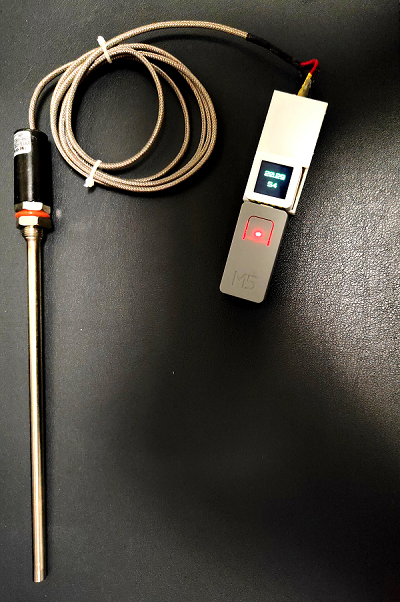
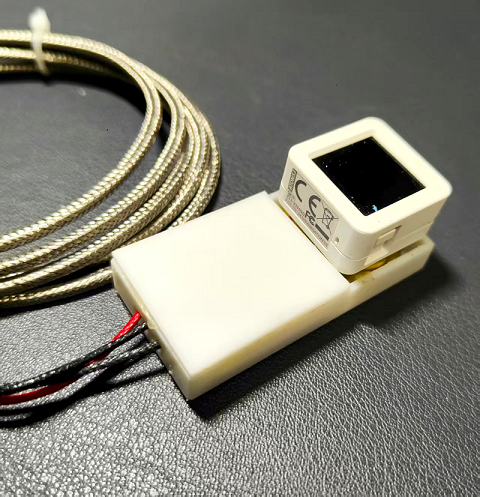
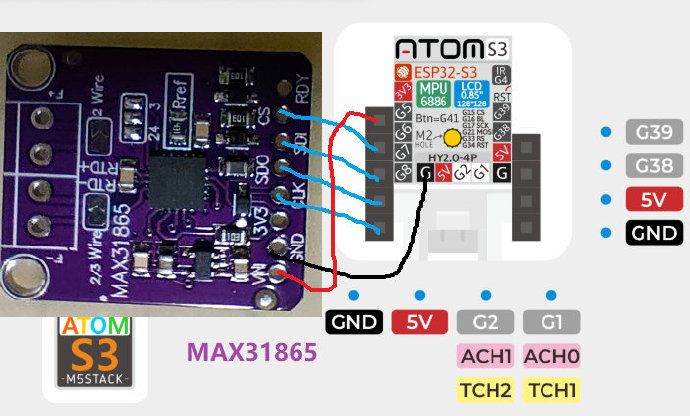
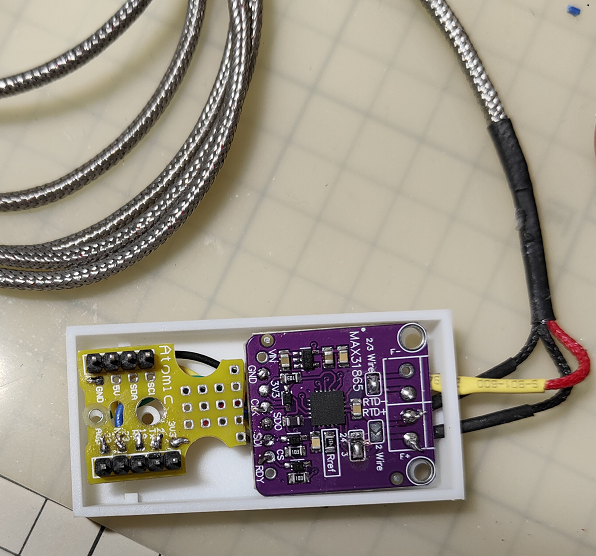
(1) Part A: Front-end Data Acquisition and Transmission Terminal: A platinum RTD temperature sensor PT100 + MAX31865 + M5Stack AtomS3 form the acquisition, data processing, and transmission terminal capable of measuring the bean temperature in a semi-direct flame coffee roaster.Wiring:
M5AtomS3 GPIO5 --> MAX31865 CS
M5AtomS3 GPIO6 --> MAX31865 DI (MOSI)
M5AtomS3 GPIO7 --> MAX31865 DO (MISO)
M5AtomS3 GPIO8 --> MAX31865 CLK
M5AtomS3 3V3 --> MAX31865 VIN
M5AtomS3 GND --> MAX31865 GND
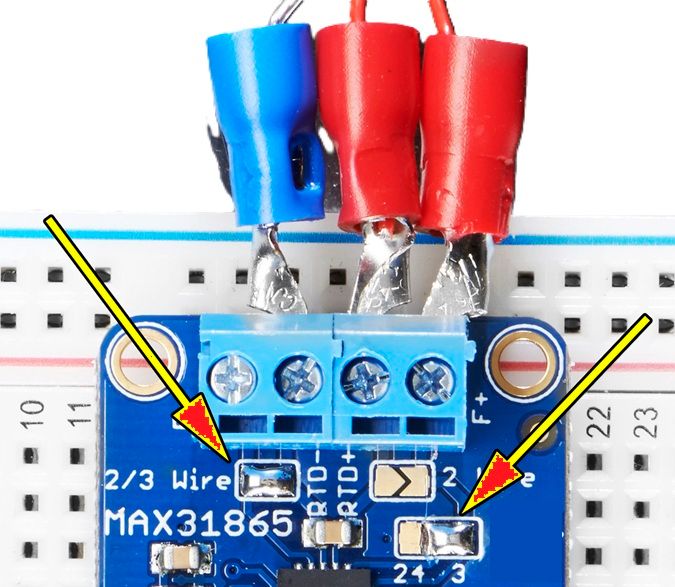
PT100 Wiring:
MAX31865 RTD- --> PT100 Blue wire
MAX31865 RTD+ --> PT100 Red wire
MAX31865 F+ --> PT100 Red wire (Note: This wiring suggests a 2-wire configuration. Typically F+ and F- are for fault detection and might be connected differently or not used. Standard 2-wire: RTD+ to one PT100 lead, RTD- to the other, often with F+ shorted to RTD+ and F- shorted to RTD- for 2-wire mode. Please verify based on MAX31865 datasheet and your specific PT100 sensor).
Resistor Handling: 2/3 wire jumper shorted (for 2-wire mode).
24-X connection open, X-3 shorted (likely refers to specific terminal block connections on some MAX31865 modules).
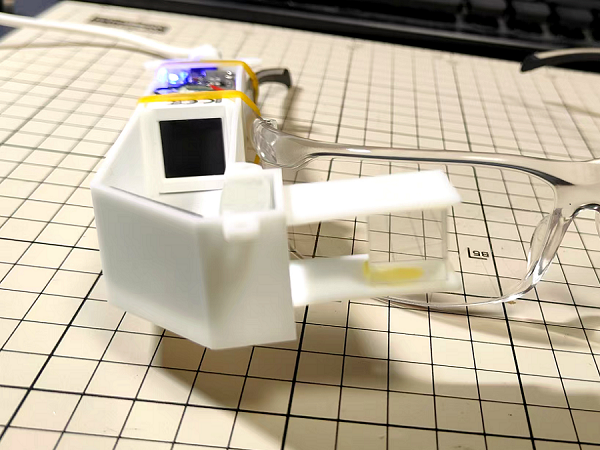
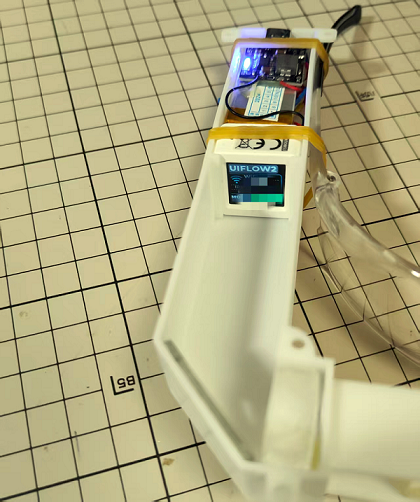
Code:#include <Arduino.h> #include <M5AtomS3.h> #include <esp_now.h> #include <WiFi.h> #include <Adafruit_MAX31865.h> #include <Wire.h> // MAX31865 引脚配置 #define RREF 430.0 // PT100 参考电阻 #define RNOMINAL 100.0 // PT100 标称电阻 // 使用软件 SPI 初始化 MAX31865 #define MAX_CS 5 // CS 引脚 #define MAX_DI 6 // DI 引脚 #define MAX_DO 7 // DO 引脚 #define MAX_CLK 8 // CLK 引脚 Adafruit_MAX31865 thermo = Adafruit_MAX31865(MAX_CS, MAX_DI, MAX_DO, MAX_CLK); // 接收端的 MAC 地址 uint8_t receiverAddress[] ={0xDC, 0x54, 0x75, 0xC8, 0x8E, 0x28}; // 接收端的 MAC 地址 // 发送的数据结构 typedef struct struct_message { int id; float temperature; unsigned long elapsedTime; // 计时器时间 bool status; } struct_message; // 创建一个数据包 struct_message myData; // 计时器变量 unsigned long timer = 0; unsigned long startMillis = 0; // 新增计时基准点 // 定义GPIO1为串口发送引脚 #define TX_PIN 1 // 使用HardwareSerial库创建UART1实例 HardwareSerial MySerial1(1); // 回调函数,用于发送数据后的状态检查 void OnDataSent(const uint8_t *mac_addr, esp_now_send_status_t status) { Serial.print("Last Packet Send Status: "); Serial.println(status == ESP_NOW_SEND_SUCCESS ? "Success" : "Fail"); } void clearAllPeers() { esp_now_deinit(); // 反初始化ESP-NOW esp_now_init(); // 重新初始化 Serial.println("clear all devide peer!"); } bool addPeerIfNeeded(const uint8_t *mac, int channel = 0) { if (esp_now_is_peer_exist(mac)) { Serial.println("设备已存在,跳过添加"); return true; } esp_now_peer_info_t peerInfo = {}; memcpy(peerInfo.peer_addr, mac, 6); peerInfo.channel = channel; peerInfo.encrypt = false; if (esp_now_add_peer(&peerInfo) != ESP_OK) { Serial.println("添加失败,可能列表已满"); return false; } return true; } void setup() { // 初始化 M5AtomS3 auto cfg = M5.config(); AtomS3.begin(cfg); Serial.begin(); MySerial1.begin(115200,SERIAL_8N1,-1,TX_PIN);//定义MySerial1的规约、速率以及没有RX,TX要接到TTL-USB模块的RX端子 AtomS3.Display.setTextColor(GREEN); AtomS3.Display.setTextDatum(middle_center); AtomS3.Display.setTextFont(&fonts::Orbitron_Light_24); AtomS3.Display.setTextSize(1); AtomS3.Display.drawString("Temp", AtomS3.Display.width() / 2, AtomS3.Display.height() / 2); // 初始化 MAX31865 thermo.begin(MAX31865_3WIRE); // 3 线制 PT100 // 设置设备为 Wi-Fi Station 模式 WiFi.mode(WIFI_STA); //全量清除所有对等设备 clearAllPeers(); // 初始化 ESP-NOW if (esp_now_init() == ESP_OK) { Serial.println("initializing ESP-NOW OK.."); } else { Serial.println("Error initializing ESP-NOW"); return; } // 注册发送回调函数 esp_now_register_send_cb(OnDataSent); // 添加接收端 esp_now_peer_info_t peerInfo={}; memcpy(peerInfo.peer_addr, receiverAddress, 6); peerInfo.channel = 0; // 使用与发送端相同的信道 peerInfo.encrypt = false; // 不使用加密 // 先尝试删除已有设备(可选) esp_now_del_peer(receiverAddress); esp_err_t result = esp_now_add_peer(&peerInfo); if (result == ESP_OK) { Serial.println("Peer added successfully.."); } else { Serial.printf("Add peer failed: 0x%X - %s\n", result, esp_err_to_name(result)); } startMillis = millis(); } void loop() { AtomS3.update(); // 检查按钮是否按下 if (AtomS3.BtnA.wasPressed()) { startMillis = millis(); // 重置基准点 timer = 0; // 计数器清零 } // 读取温度数据 uint16_t rtd = thermo.readRTD(); float ratio = (float)rtd / 32768.0; float temperature = thermo.temperature(RNOMINAL, RREF); // 更新计时器 unsigned long currentMillis = millis(); timer = (currentMillis - startMillis) / 1000; // 自动转换为秒 // 设置要发送的数据 myData.id = 1; myData.temperature = temperature; myData.elapsedTime = timer; myData.status = true; // 发送数据 if (!esp_now_is_peer_exist(receiverAddress)) { if (!addPeerIfNeeded(receiverAddress)) return; // 添加失败则退出 } // 独立控制数据发送频率 static unsigned long lastSendTime = 0; if (currentMillis - lastSendTime >= 1000) { esp_err_t result = esp_now_send(receiverAddress, (uint8_t *) &myData, sizeof(myData)); if (result == ESP_OK) { Serial.println("Sent with success.."); } else { Serial.println("Error sending the data"); } // 格式化温度和时间数据为字符串 String data = String(temperature, 2) + "," + String(timer); // 通过硬串口向PC发送数据 MySerial1.println(data); // 新增计时基准点初始化 lastSendTime = currentMillis; } // 显示发送的数据 AtomS3.Display.clear(); AtomS3.Display.drawString(String(myData.temperature), AtomS3.Display.width() / 2, AtomS3.Display.height() / 2-20); AtomS3.Display.drawString(String(myData.elapsedTime), AtomS3.Display.width() / 2, AtomS3.Display.height() / 2+20); Serial.println(String(myData.temperature)); // 延迟 100ms 以避免按钮抖动 delay(100); }(2) Roasting Glasses Part: M5Stack AtomS3 + lithium battery and its charging management module + the optical components of the glasses (mirror, magnifying lens, and beam splitter prism) + 3D printed glasses structure form the reception and display terminal.
Step 1: Structure: 3D modeling and printing. Create a compartment for "AtomS3 + lithium battery and charging management module + micro switch". Create the optical path: from AtomS3 screen --> mirror --> magnifying lens --> beam splitter prism. The magnifying lens needs to be cut, leaving the central part. The beam splitter prism is 50:50.
Step 2: Electrical: AtomS3 + lithium battery and charging management module + micro switch constitute the power management.
Code:#include <Arduino.h> #include <M5AtomS3.h> #include <esp_now.h> #include <WiFi.h> #include <Adafruit_MAX31865.h> #include <Wire.h> // 函数原型声明 String secondsToMinSec(unsigned long totalSeconds); float calculateTemperatureRise(float initialTemperature, float finalTemperature, unsigned long elapsedTime); // 接收的数据结构 typedef struct struct_message { int id; float temperature; unsigned long elapsedTime; // 计时器时间 bool status; } struct_message; // 创建一个数据包 struct_message myData; // 用于存储上一个接收到的温度和时间 float previousTemperature = 0; unsigned long previousElapsedTime = 0; // 滤波器相关变量 const int filterWindowSize = 5; // 滤波窗口大小 float temperatureBuffer[filterWindowSize] = {0}; // 存储最近的温度值 int bufferIndex = 0; // 当前写入索引 float filteredTemperature = 0; // 当前滤波后的温度 void clearAllPeers() { esp_now_deinit(); // 反初始化ESP-NOW esp_now_init(); // 重新初始化 Serial.println("clear all device peer!"); } // 更新滤波器 void updateTemperatureFilter(float newTemperature) { // 更新温度缓冲区 temperatureBuffer[bufferIndex] = newTemperature; bufferIndex = (bufferIndex + 1) % filterWindowSize; // 循环使用缓冲区 // 计算滤波后的温度 filteredTemperature = 0; for (int i = 0; i < filterWindowSize; i++) { filteredTemperature += temperatureBuffer[i]; } filteredTemperature /= filterWindowSize; // 计算平均值 } // 回调函数,用于接收数据 void OnDataRecv(const uint8_t *mac_addr, const uint8_t *incomingData, int len) { memcpy(&myData, incomingData, sizeof(myData)); // 串口打印接收到的数据 Serial.print("ID: "); Serial.println(myData.id); Serial.print("Temperature: "); Serial.println(myData.temperature); Serial.print("Elapsed Time: "); Serial.println(myData.elapsedTime); Serial.print("Status: "); Serial.println(myData.status ? "ON" : "OFF"); // 更新滤波器 updateTemperatureFilter(myData.temperature); // 计算温升 float tempRise = calculateTemperatureRise(previousTemperature, filteredTemperature, myData.elapsedTime - previousElapsedTime); // 在屏幕上显示接收到的数据 AtomS3.Display.clear(); AtomS3.Display.setTextColor(BLUE,GREEN); AtomS3.Display.setTextDatum(middle_center); AtomS3.Display.setTextFont(&fonts::Orbitron_Light_24); AtomS3.Display.setTextSize(1); AtomS3.Display.drawString("" + String(filteredTemperature), AtomS3.Display.width() / 2, AtomS3.Display.height() / 2 - 20); AtomS3.Display.drawString("" + secondsToMinSec(myData.elapsedTime), AtomS3.Display.width() / 2, AtomS3.Display.height() / 2 + 20); // 显示温升 AtomS3.Display.drawString("Temp Rise: " + String(tempRise) + "°C/min", AtomS3.Display.width() / 2, AtomS3.Display.height() / 2 + 50); // 更新上一个温度和时间 previousTemperature = filteredTemperature; // 使用滤波后的温度 previousElapsedTime = myData.elapsedTime; } void setup() { // 初始化 M5AtomS3 auto cfg = M5.config(); AtomS3.begin(cfg); Serial.begin(); AtomS3.Display.setTextColor(GREEN); AtomS3.Display.setTextDatum(middle_center); AtomS3.Display.setTextFont(&fonts::DejaVu18); AtomS3.Display.setTextSize(1); AtomS3.Display.drawString("Waiting for data...", AtomS3.Display.width() / 2, AtomS3.Display.height() / 2); // 设置设备为 Wi-Fi Station 模式 WiFi.mode(WIFI_STA); clearAllPeers(); delay(2000); // 初始化 ESP-NOW if (esp_now_init() == ESP_OK) { Serial.println("initializing ESP-NOW OK.."); } else { Serial.println("Error initializing ESP-NOW "); return; } // 注册接收回调函数 esp_now_register_recv_cb(OnDataRecv); } void loop() { AtomS3.update(); } // 秒数转 "XmXXs" 格式函数 String secondsToMinSec(unsigned long totalSeconds) { int minutes = totalSeconds / 60; int seconds = totalSeconds % 60; return String(minutes) + "m" + String(seconds) + "s"; } // 计算温升函数 float calculateTemperatureRise(float initialTemperature, float finalTemperature, unsigned long elapsedTime) { if (elapsedTime == 0) return 0; // 避免除以零 float temperatureChange = finalTemperature - initialTemperature; // 温度变化量 return (temperatureChange / (elapsedTime / 60000.0)); // 每分钟温度升高的值 }
Hello! It looks like you're interested in this conversation, but you don't have an account yet.
Getting fed up of having to scroll through the same posts each visit? When you register for an account, you'll always come back to exactly where you were before, and choose to be notified of new replies (either via email, or push notification). You'll also be able to save bookmarks and upvote posts to show your appreciation to other community members.
With your input, this post could be even better 💗
Register Login