Micro-Bit

-
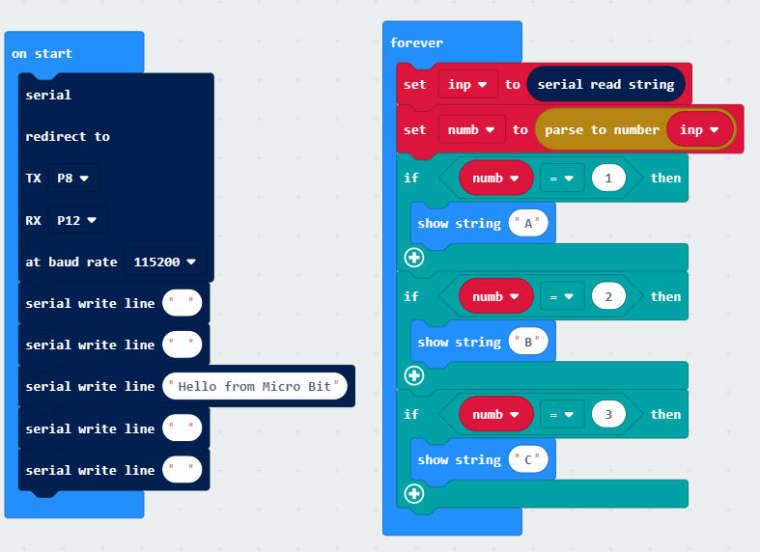
Simple test/demo to show how to communicate with the Micro-bit.

The Micro-bit program ;;
As javascript ;
let numb = 0
let inp = ""
serial.redirect(
SerialPin.P8,
SerialPin.P12,
BaudRate.BaudRate115200
)
serial.writeLine("")
serial.writeLine("")
serial.writeLine("Hello from Micro Bit")
serial.writeLine("")
serial.writeLine("")
basic.forever(function () {
    inp = serial.readString()
    numb = parseFloat(inp)
    if (numb == 1) {
        basic.showString("A")
    }
    if (numb == 2) {
        basic.showString("B")
    }
    if (numb == 3) {
        basic.showString("C")
    }
})
And the M5stack code (arduino)
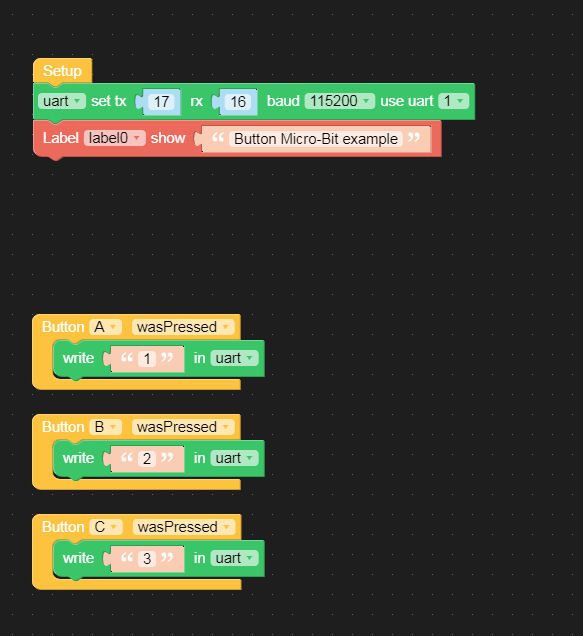
#include <M5Stack.h>
#include <M5StackUpdater.h>


// The setup() function runs once each time the micro-controller starts
void setup() {
  M5.begin();
  Wire.begin();
  if(digitalRead(BUTTON_A_PIN) == 0){
    Serial.println("Will load menu binary");
    updateFromFS(SD);
    ESP.restart();
  }

  Serial2.begin(115200, SERIAL_8N1, 16, 17);
  M5.Lcd.clear(BLACK);
  M5.Lcd.setTextColor(YELLOW);
  M5.Lcd.setTextSize(2);
  M5.Lcd.setCursor(0, 10);
  M5.Lcd.println("Button Micro-Bit example");
  M5.Lcd.println();
}

// Add the main program code into the continuous loop() function
void loop() {
  // update button state
  M5.update();
  if(Serial2.available()) {
   char ch = Serial2.read();
   if ( (ch >+ 'A') && (ch +'z') )M5.Lcd.write(ch);
  }
  if (M5.BtnA.wasReleased()) {
    Serial2.write('1');
  } else if (M5.BtnB.wasReleased()) {
    Serial2.write('2');
  } else if (M5.BtnC.wasReleased()) {
    Serial2.write('3');
  }
}
If you have a Micro-bit I suppose you know how to put the code in (I use makecode (offline) online version schould work the same..
and then use the arduino to program the M5stack....
Then press button A on the M5 and the Micro-bit shows a A..
Same with button B and C...Just for fun and to show how to communicate with the micro-bit..
-
Thanks so much for this @ChrisWR as you may have noticed there was only one example ever released for the M5:bit, would be cool if we could get more microbitters on board with using the M5:Bit. I'm gonna share this with those that have been asking about using the M5:bit. Would you be ok with putting this guide on our hackster.io page? that way this valuable information doesn't get lost among the myriad posts on the forum.
-
Simple test/demo to show how to communicate with the Micro-bit.
The Micro-bit program ;;
As javascript ;
- let numb = 0
- let inp = ""
- serial.redirect(
- SerialPin.P8,
- SerialPin.P12,
- BaudRate.BaudRate115200
- )
- serial.writeLine("")
- serial.writeLine("")
- serial.writeLine("Hello from Micro Bit")
- serial.writeLine("")
- serial.writeLine("")
- basic.forever(function () {
-
inp = serial.readString() -
numb = parseFloat(inp) -
if (numb == 1) { -
basic.showString("A") -
} -
if (numb == 2) { -
basic.showString("B") -
} -
if (numb == 3) { -
basic.showString("C") -
} - })
And the M5stack code (arduino)
- #include <M5Stack.h>
- #include <M5StackUpdater.h>
- // The setup() function runs once each time the micro-controller starts
- void setup() {
- M5.begin();
- Wire.begin();
- // If using Lovyan launcher
- if(digitalRead(BUTTON_A_PIN) == 0){
-
Serial.println("Will load menu binary"); -
updateFromFS(SD); -
ESP.restart(); - }
- Serial2.begin(115200, SERIAL_8N1, 16, 17);
- M5.Lcd.clear(BLACK);
- M5.Lcd.setTextColor(YELLOW);
- M5.Lcd.setTextSize(2);
- M5.Lcd.setCursor(0, 10);
- M5.Lcd.println("Button Micro-Bit example");
- M5.Lcd.println();
- }
- // Add the main program code into the continuous loop() function
- void loop() {
- // update button state
- M5.update();
- if(Serial2.available()) {
- char ch = Serial2.read();
- if ( (ch >+ 'A') && (ch +'z') )M5.Lcd.write(ch);
- }
- if (M5.BtnA.wasReleased()) {
-
Serial2.write('1'); - } else if (M5.BtnB.wasReleased()) {
-
Serial2.write('2'); - } else if (M5.BtnC.wasReleased()) {
-
Serial2.write('3'); - }
- }
If you have a Micro-bit I suppose you know how to put the code in (I use makecode (offline) online version schould work the same..
and then use the arduino to program the M5stack....
Then press button A on the M5 and the Micro-bit shows a A..
Same with button B and C...Just for fun and to show how to communicate with the micro-bit..
Nice, could you achieve the same thing in UIFLOW using the Blocky environment?
-
-
Now I need to find my bits to play with this and explore.
Thank you my friend for this.
-
@ajb2k3 Youre welcome.. I just saw the loop at the end was gone tho.. should be an (empty) loop under the red block..
-
-
Just a little gotcha, I've been using the Core2 with IoT Base CatM for UART (Port C) to connect to micro:bit (Keyestudio Ks0360 rather than M5:bit).
Core2 (vs original Core) on IoT Base CatM config appears to be that pins 13/14 are used for UART (vs 17/18) hence:
Groove cable (M5Stack spec) W|Y|R|B = 13(R)|14(T)|VCC|GND
Connected to micro:bit W|Y|R|B = 15(T)|16(R)|VCC|GNDNB I am using Keyestudio shield/carrier board to match power to 5V and control to 3V3. Minor mods to the code above with a little pause for effect and it's working to flash LEDs [0, 0], [2, 2] and [4, 4] and send back text strings from buttons A and B to label.
Hello! It looks like you're interested in this conversation, but you don't have an account yet.
Getting fed up of having to scroll through the same posts each visit? When you register for an account, you'll always come back to exactly where you were before, and choose to be notified of new replies (either via email, or push notification). You'll also be able to save bookmarks and upvote posts to show your appreciation to other community members.
With your input, this post could be even better 💗
Register Login