🤖Have you ever tried Chat.M5Stack.com before asking??😎
    M5Stack Community
    • Categories
    • Recent
    • Tags
    • Popular
    • Users
    • Groups
    • Search
    • Register
    • Login

    M5ez 2.0: testers wanted...

    M5EZ
    7
    26
    106.6k
    Loading More Posts
    • Oldest to Newest
    • Newest to Oldest
    • Most Votes
    Reply
    • Reply as topic
    Log in to reply
    This topic has been deleted. Only users with topic management privileges can see it.
    • P
      prickle
      last edited by

      Hi guys, new user here. Tried M5ez installing from Manage Libraries, went to compile M5ez-demo, got the following error.

      Arduino: 1.8.7 (Windows 7), TD: 1.44, Board: "M5Stack-Core-ESP32, QIO, 80MHz, Default, 921600, None"

      C:\Users\prickle\Documents\Quadcopter\Arduino\libraries\M5ez\src/M5ez.h:28:49: fatal error: ezTime.h: No such file or directory

      compilation terminated.

      B 1 Reply Last reply Reply Quote 0
      • B
        bobolink @prickle
        last edited by

        @prickle
        You have to load @Rop’s ezTime Arduino library.
        Instructions are actually in the upgrade notes but I didn’t read those either.

        1 Reply Last reply Reply Quote 0
        • P
          prickle
          last edited by

          I totally missed that link, cheers!

          1 Reply Last reply Reply Quote 0
          • R
            r_255
            last edited by r_255

            Happy with v2.0
            The slider works fine now !

            While looking into your code to find the brightness slider i realized you did a shit load of work in a short period ... Amazing!
            Big thank you!

            0_1539752015056_dimmer_00.jpg

            Also made one based on the image menu and let the slider jump in steps of 20 and simply change the image
            Still having a hard time with the programming, but slowly i am getting some where.

            RopR 1 Reply Last reply Reply Quote 0
            • RopR
              Rop @r_255
              last edited by

              @r_255 I would not go that route and write code that draws the image. And I would use the M5ez buttons on the display. If you want multiple sliders (for RGBW etc), you will end up wanting the long/short press functions to switch sliders and operate the sliders without too many presses. Your images have made me think about how to make things more generic and configurable...

              1 Reply Last reply Reply Quote 0
              • R
                r_255
                last edited by

                Hey Rop,

                I agree, and what you see is just a image from my design program. To get a estimate on how it looks in total on the m5. In the working model i use your header and buttons.

                i did just adjust the dark theme a bit and in between my image shows.

                Just playing with your work and see where the limits are. So far my programming is what limits me.

                Stuck on how to get the _brigtness value into my mqtt.
                Tried almost everything i can think of, did look into other code
                did look how variables are used, but this syntax is over my head. This publishes _Brightness as text but not as value.
                So close and still far away... It frustrates me over the past 2 days now.

                client.publish("domoticz/in", "{"command": "switchlight", "idx": 143, "switchcmd": "Set Level", "level": _brightness; }");

                It's just the basic skills i am missing, but in general i can understand what is happening.

                I agree on usability like in rgbw, but left or right and next option will set the previous isnt that hard. Less pushes makes things more use able, thats something that is my experience.

                a double push to go a level up/cancel might be more easy to understand for end users of the interface. While a enter or a level down is a single push of the middle button.

                Again, thanks for all your hard work ! and i do hope that the community contributes a bit more as in sharing experiences and code. So we dont expect 3.0 but there is still hope for v2.99 ;o)

                cheers
                Robin

                RopR 1 Reply Last reply Reply Quote 0
                • RopR
                  Rop @r_255
                  last edited by

                  @r_255 I don't know about this mqtt implementation, but in general, one would use _brightness.toInt() or _brightness.toFloat() to turn variable _brightness from a String into a number. Hope that helps.

                  R 1 Reply Last reply Reply Quote 0
                  • R
                    r_255 @Rop
                    last edited by r_255

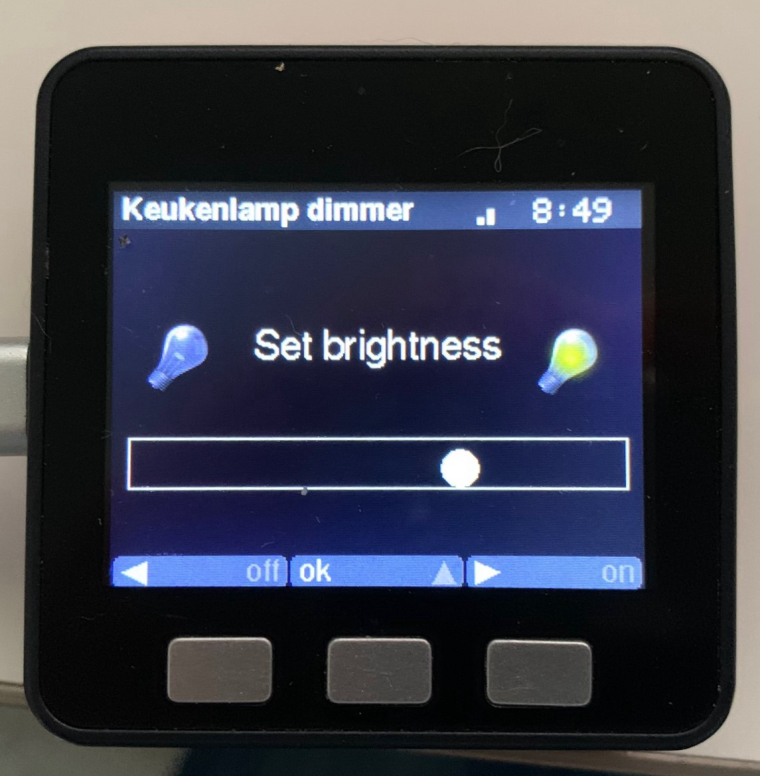
                    void menu_brightness_slider(){
                      ezProgressBar bl ("Keukenlamp dimmer", "Set brightness", "left#off#ok#up#right#on");
                                while (true) {
                                  
                                  String b = ez.buttons.poll();
                                  
                                  if (b == "right" && brightness <= 90) brightness += 10;
                                  if (!brightness) brightness = 100;
                                  if (b == "left" && brightness > 11) brightness -= 10;
                                  if (b == "left" && brightness < 11) brightness = 0.01;
                                  bl.value((float)(brightness));
                                  if (b == "ok") break;
                                  if (b == "off")brightness = 0.01;
                                  if (b == "on")brightness = 100;
                                  if (b == "up") loop();
                    }
                     
                    // Prepare a JSON payload string
                      String payload = "";
                      payload += "{";
                      payload += "\"command\": \"switchlight\", \"idx\": 143, \"switchcmd\": \"Set Level\", \"level\":";
                      payload += brightness;
                      payload += "}";
                    
                      // Send payload
                      char attributes[100];
                      payload.toCharArray( attributes, 100 );
                      client.publish( "domoticz/in", attributes );
                      Serial.println( attributes );
                      menu_brightness_slider();
                    }
                    

                    This works ! :O)

                    0_1539883795078_m5dimmer.jpg

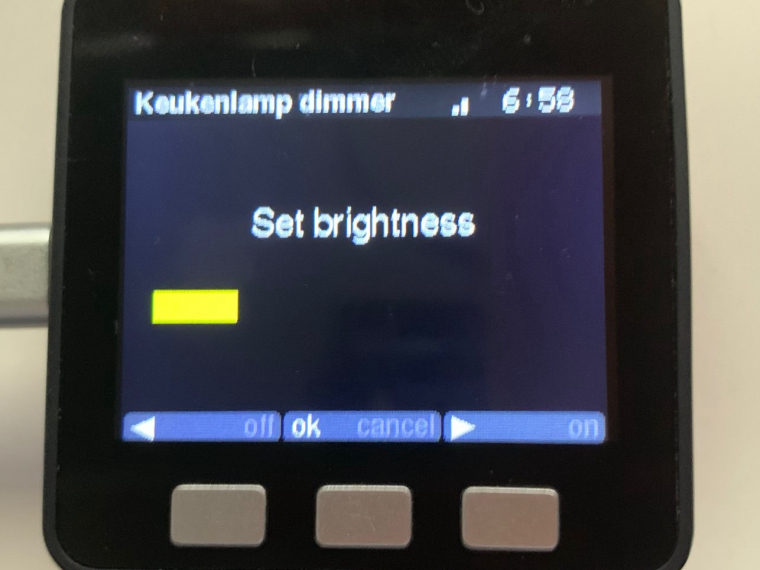
                    Now a long press set on or off or back to menu

                    1 Reply Last reply Reply Quote 0
                    • R
                      r_255
                      last edited by

                      0_1540105015957_IMG_0135.jpg

                      Well slowly i am getting somewhere

                      RopR 1 Reply Last reply Reply Quote 1
                      • RopR
                        Rop @r_255
                        last edited by

                        @r_255 Cool! :)

                        1 Reply Last reply Reply Quote 0
                        • ajb2k3A
                          ajb2k3
                          last edited by

                          Strang bug appears in this code

                          #include <M5ez.h>
                          #include <ezTime.h>
                          #include "images.h"
                          #define MAIN_DECLARED
                          void setup() {
                          #include <themes/default.h>
                          #include <themes/dark.h>
                          ezt::setDebug(INFO);
                          ez.begin();
                          }
                          void loop() {
                          ezMenu images;
                          images.imgBackground(TFT_BLACK);
                          images.imgFromTop(40);
                          images.imgCaptionColor(TFT_WHITE);
                          images.addItem(sysinfo_jpg, "Photo Turntable", sysInfo);
                          images.run();
                          }

                          The title "Photo Turntable" get printed on the top and the bottom of the screen.
                          (sorry no picture)

                          UIFlow, so easy an adult can learn it!
                          If I don't know it, be patient!
                          I've ether not learned it or am too drunk to remember it!
                          Author of the WIP UIFlow Handbook!
                          M5Black, Go, Stick, Core2, and so much more it cant be fit in here!

                          RopR 1 Reply Last reply Reply Quote 0
                          • RopR
                            Rop @ajb2k3
                            last edited by

                            @ajb2k3 You're absolutely right: the feature to be able to change the captions of text menus while the menu is active had introduced this error on some image menu displays. Fixed in version 2.0.1 which I just released. :)

                            ajb2k3A 1 Reply Last reply Reply Quote 1
                            • ajb2k3A
                              ajb2k3 @Rop
                              last edited by

                              @rop
                              I was messing with the image menu trying to create an image screen.

                              UIFlow, so easy an adult can learn it!
                              If I don't know it, be patient!
                              I've ether not learned it or am too drunk to remember it!
                              Author of the WIP UIFlow Handbook!
                              M5Black, Go, Stick, Core2, and so much more it cant be fit in here!

                              RopR 1 Reply Last reply Reply Quote 0
                              • RopR
                                Rop @ajb2k3
                                last edited by

                                @ajb2k3 Single image screens can be done with a one item menu. I was thinking of also adding the possibility of providing an image to ez.msgBox, but probably the 1-item menu approach is more flexible because it allows for a caption.

                                1 Reply Last reply Reply Quote 0
                                • R
                                  r_255
                                  last edited by r_255

                                  You could also add just an image to your mez screen.like this. But it has to be on a sd card.

                                  M5.Lcd.drawJpgFile(SD, "/c50x50_light_icon_off.jpg",20, 75, 50, 50);

                                  Below is my experiment to make my own dynamic slider to get familiar with the arduino ide and m5ez
                                  The end goal is to read the value from mqtt and set the slider to the known value of the dimmer and set it

                                  int bar_position = 25 ; // START POSTITION ( TO DO : READ THIS VALUE FROM MQTT AND SET IT )
                                  

                                  Drop the line above in top of the m5ez to set the start position of the bar. Paste the below code in de the m5ez demo add to the main menu.

                                  void menu_brightness_slider(){
                                  
                                    int Bar_step_amount = 10;  // bar is devided in XX steps ( for on/of set to 1 )
                                    int Bar_lenght = 275; // Length of the slider bar
                                    int Bar_height = 28;  // Height of the slider bar
                                    int Bar_steps = Bar_lenght / Bar_step_amount;
                                            
                                                
                                    int Top_hLine_Start_X = 22; // X postion on screen from the left side
                                    int Top_hLine_Start_Y = 150; // Y-postition on screen from the top
                                    int Top_hLine_End_X = Bar_lenght + Top_hLine_Start_X ; // X End line postion on screen from the left side
                                    int Top_hLine_End_Y = Top_hLine_Start_Y;
                                  
                                    int Bot_hLine_Start_X = Top_hLine_Start_X;
                                    int Bot_hLine_Start_Y = Top_hLine_Start_Y + Bar_height ;
                                    int Bot_hLine_End_X = Top_hLine_Start_X + Bar_lenght ; 
                                    int Bot_hLine_End_Y = Bar_height + Top_hLine_End_Y ;
                                                
                                    int Start_Point = Top_hLine_Start_X;
                                    int End_Point = Top_hLine_Start_X + Bar_lenght;
                                    int But_Radius = 10; // size of the slider indicator 
                                  
                                    int mid_button = Top_hLine_Start_Y + ( Bar_height/2 );
                                    int bar_start_position = Top_hLine_Start_X + ( But_Radius ) ;
                                    int bar_end_position = Top_hLine_End_X - ( But_Radius ) ;
                                  
                                    ezProgressBar bl ("Keukenlamp dimmer", " brightness " , "left# #ok#up#right# ");
                                        while (true) {
                                              String b = ez.buttons.poll();
                                  
                                                //Draw lamp images and load them from sd root
                                                M5.Lcd.drawJpgFile(SD, "/c50x50_light_icon_off.jpg",20, 75, 50, 50);
                                                M5.Lcd.drawJpgFile(SD, "/c50x50_light_icon_on.jpg",255, 77, 50, 50);
                                  
                                                // conversion to 0 -- 100 to set dimmer
                                                int dimmer_value = (( bar_position / Bar_steps ) * 10 );
                                                Serial.println( dimmer_value );        
                                            
                                                // slider indicator draw
                                                M5.Lcd.fillCircle((  bar_position ) , mid_button, But_Radius, 0xffff); // draw a white dot based on the _bar_y value
                                                M5.Lcd.fillCircle(( bar_position - Bar_steps ), mid_button, But_Radius, 0x0000); // draw a blck dot based on the _bar_y value
                                                M5.Lcd.fillCircle(( bar_position + Bar_steps ) , mid_button, But_Radius, 0x0000); // draw a blck dot based on the _bar_y value
                                                
                                                // Draw the rectangle for the slider
                                                M5.Lcd.drawLine(Top_hLine_Start_X, Top_hLine_Start_Y, Top_hLine_End_X, Top_hLine_End_Y, 0xffff); //Draw a line from the point X0 and Y0 to the point X1 and Y1 with a color from 0 to 65535
                                                //M5.Lcd.drawLine((Top_hLine_Start_X - 1), (Top_hLine_Start_Y  + 2), Top_hLine_End_X - 1 , Top_hLine_End_Y + 2 , 0x0ff0); //shade line 
                                                M5.Lcd.drawLine(Bot_hLine_Start_X, Bot_hLine_Start_Y, Bot_hLine_End_X, Bot_hLine_End_Y, 0xffff); //Draw a second hor line and draw 2 vertical lines between them in the next two lines of code
                                                M5.Lcd.drawLine(Top_hLine_Start_X, Top_hLine_Start_Y, Bot_hLine_Start_X, Bot_hLine_Start_Y, 0xffff); //Left vert drawn line based on top and bot line
                                                M5.Lcd.drawLine(Top_hLine_End_X, Top_hLine_Start_Y, Bot_hLine_End_X, Bot_hLine_End_Y, 0xffff);//Right vert drawn line based on top and bot line


                                                /////////////////// Steps right
                                               if (b == "right" && bar_position <= Bar_lenght ){
                                                  ( bar_position += Bar_steps );
                                                  Serial.println ( bar_position );
                                                                }
                                                
                                                ////////////////// Steps left
                                                
                                                if (b == "left" && bar_position > Bar_steps) {
                                                  bar_position -= ( Bar_steps );
                                                Serial.println ( bar_position );
                                                                }
                                                            
                                                if (b == "on") {
                                                bar_position = Bar_lenght + 25 ;
                                                }
                                                if (b == "off"){ bar_position = Top_hLine_Start_X  ;
                                                }
                                                if (b == "ok") break;  // Jump out of loop and goto part that posts values to mqtt
                                  
                                                if (b == "up") loop();  // Jump out of loop and goto main menu 
                                  // Ok was pressed, and now we calculate the dimmer value, prepare the payload and send it
                                  dimmer_value = (( bar_position / Bar_steps ) * 10 ); 
                                  
                                    
                                  // Prepare a JSON payload string
                                    String payload = "";
                                    payload += "{";
                                    payload += "\"command\": \"switchlight\", \"idx\": 143, \"switchcmd\": \"Set Level\", \"level\":";
                                    payload += dimmer_value;
                                    payload += "}";
                                  
                                  
                                    // Send payload
                                    char attributes[100];
                                    payload.toCharArray( attributes, 100 );
                                    client.publish( "domoticz/in", attributes );
                                    Serial.println( attributes );
                                    menu_brightness_slider();// Loop and restart slider
                                  }


                                  Not as dynamic as i wished, but its a start and with some parameter adjustments the slider bar can be converted to any size and even one that looks like a on and off switch, with only 2 positions.
                                  Why not just draw a rectangle instead of 4 lines ? Well the lines could be replaced by bitmaps, so the slider button will run between bitmaps instead of over ( stacked bitmaps give me a kind of interlaced images and looks odd )

                                  in this example i convert the slider bar to a scale of 0 - 100 and post in to my domoticz setup thru mqtt ( json formated )
                                  The mqtt part of the code is missing, but thats nothing more than adding the library in the arduino ide and set the parameters.
                                  Next step will be separate the mqtt part and run that on a different core, so connection won't stall over time.

                                  1 Reply Last reply Reply Quote 0
                                  • R
                                    r_255
                                    last edited by r_255

                                    Having fun with m5ez

                                    0_1540462728485_IMG_0144.jpg

                                    Now i am a copy and paste my own code .... coder....
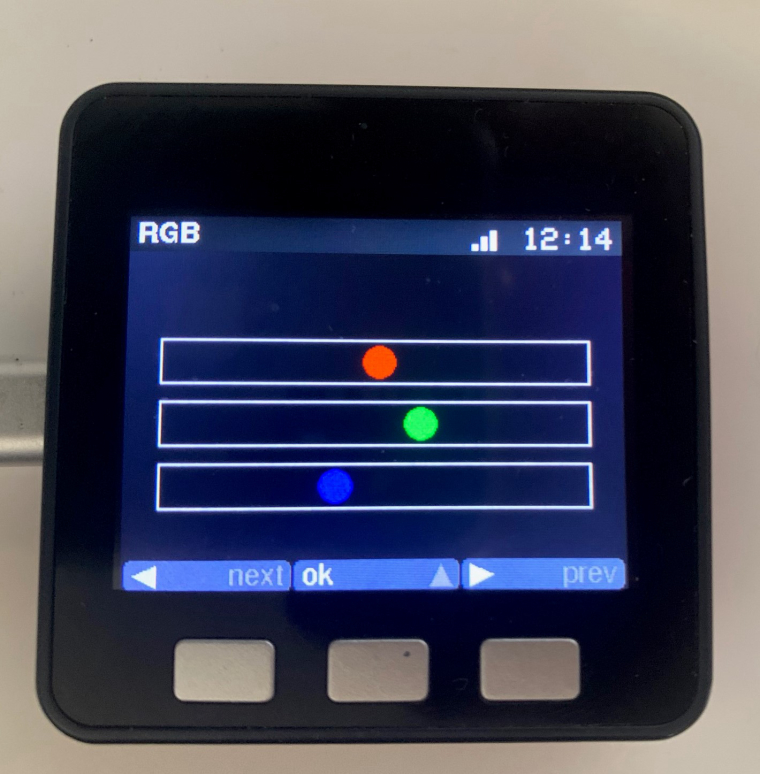
                                    Copied my slider and made a mechanism that selects and sets each slider.
                                    Next and previous makes you jump between each slider, left and right sets the value , ok publishes the value and up gets you back to the main menu.

                                    I still have issues to get my values in to m5ez object like the header, text works fine but int is still a issue. Tried to convert them to chars, but failed....
                                    So much to learn at once.

                                    1 Reply Last reply Reply Quote 0
                                    • First post
                                      Last post