myCobot 280-Ard conveyor control in an industrial simulation
-
This article was created by "Cang Hai Xiao" and is reproduced with the author's permission.
This article starts with a small example of experiencing a conveyor belt in a complete industrial scene.
Function description
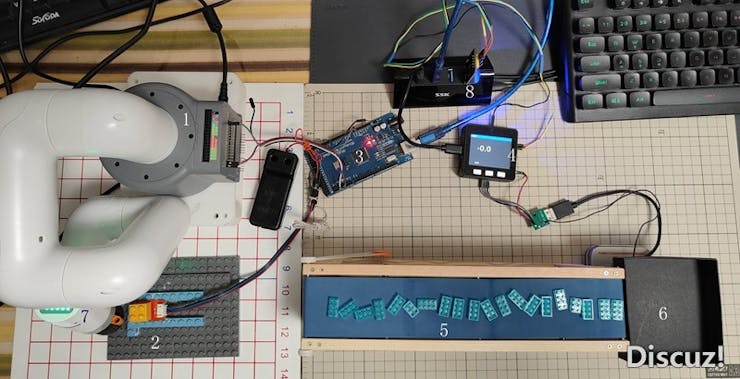
A small simulated industrial application was made with myCobot 280-Arduino Python API and load cells. I use the toy conveyor belt to transfer the parts to the weighing pan and use M5Stack Basic as the host to build an electronic scale to weigh the parts coming off the conveyor belt and then transmit the weight information in the weighing pan to the PC through UART.
Using the PC as the host computer, a simple GUI was written in python to display the weights in real time and allow the user to modify the weighing values.
Here is a detailed video of how this project works.
https://youtu.be/gAF7T5GvdYE
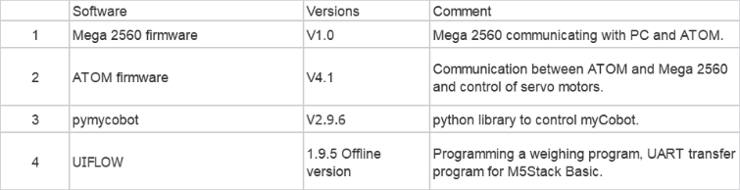
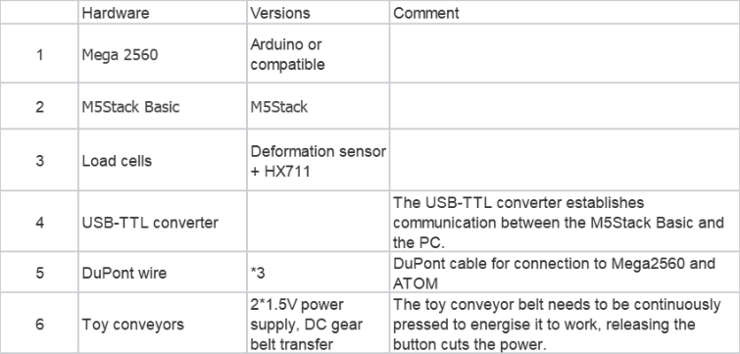
The following is the detailed process of the project.Software
Hardware
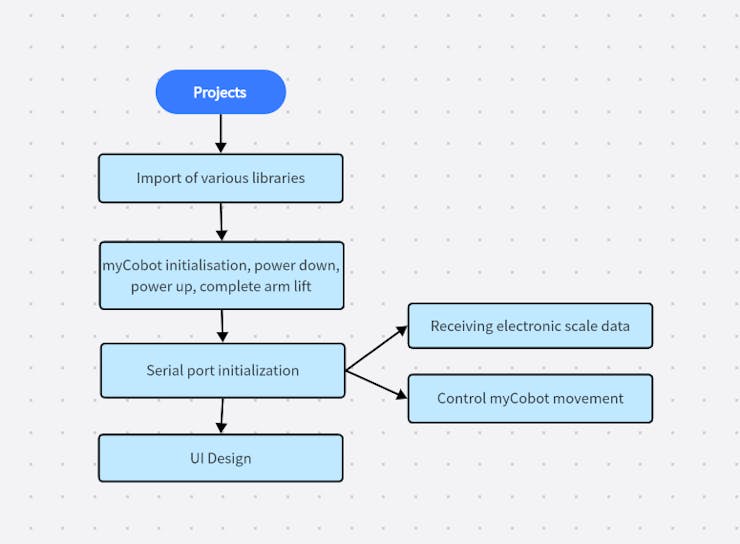
Process
Step1:
Burn Mega 2560 and ATOM firmware.(Check the Gitbook for details)

Step2:
Write a weighing program and upload the program to M5Stack Basic.Description:
-
The serial port is initialized and the connection mode is set. Establishing communication between the PC and M5stack Basic

-
Calculating ratio factors.The data read from the sensor using the M5Stack Basic are initial data and need to be calibrated with a 100g weight and a 200g weight to calculate the conversion factor into "grams". In this case we have calculated a ratio factor of -7.81.
-
Calculate the readings from the load cell and the conversion factor, and display as the weighing value.
-
Use UART1 to send the data in every 20ms. It is recommended to do an average or median filter to reduce the shock during the drop of the part from the hopper.
-
This is the event corresponding to the zero button, 100ms for button de-jitter
This is a simple electronic scale program written for UIFlow. It can also be sent to a PC via uart1 via TTL-USB and written to M5Stack Basic with a single click on Download. I have used the offline version of UIFlow for ease of connection and debugging.
Step3:
Use myBlockly to debug the parameters for the press (drop arm) and release (lift arm) actionsStep4:
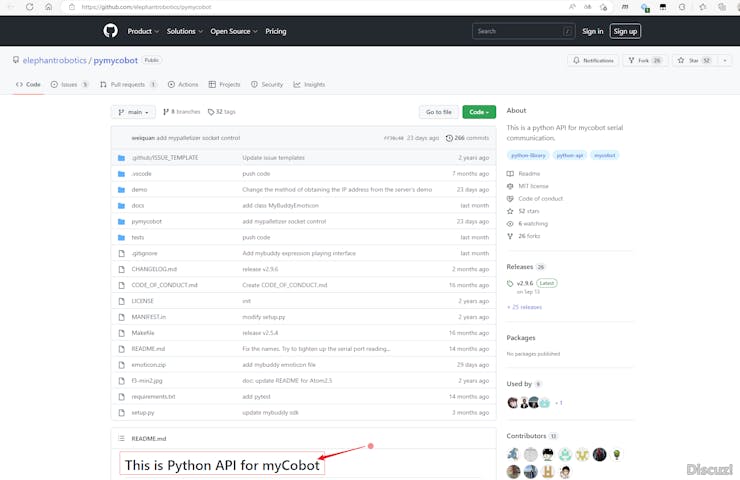
Writing PC programs and installing pymyCobot.
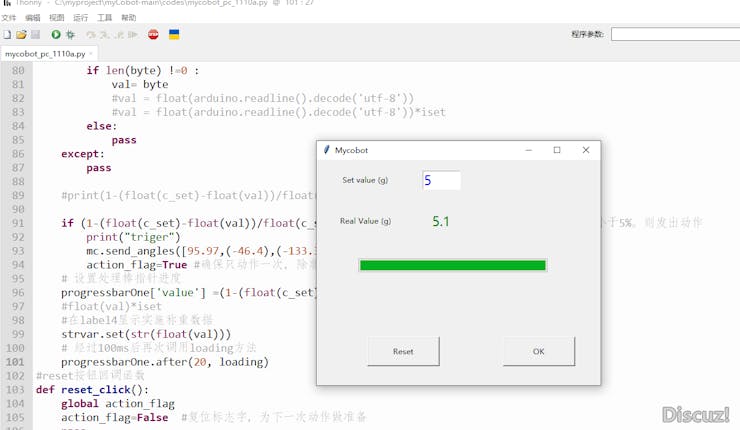
(1) First, write the GUI interface by the Tkinter library. We can set the threshold for the weighing control. For example, in this commissioning, I set 5g.
(2) Importing pymycobot
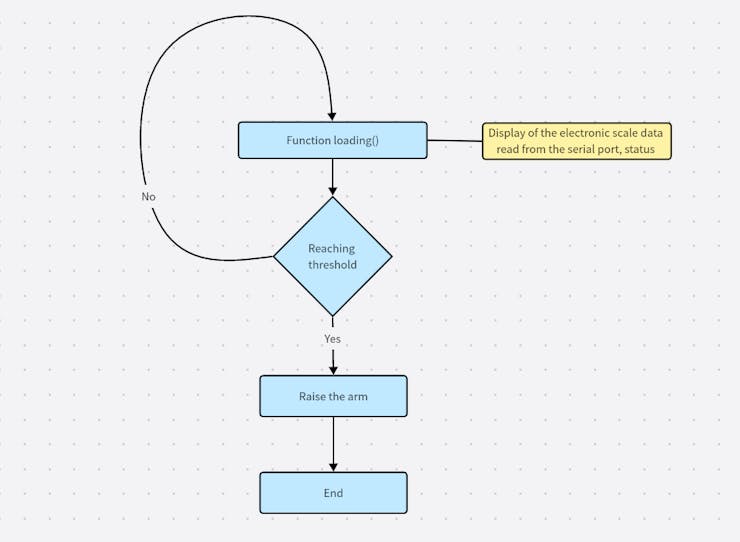
(3) A callback to the OK button first allows the myCobot drop arm to power on the conveyor, the conveyor starts working, and the electronic scale monitors the weight in real time. The loading() function is responsible for reading the serial weighing data. Then determine if the threshold is reached and control the myCobot lift arm if the threshold is reached.
Code:#============ # Function: # 1.Setting of the weighing values, displayed in the GUI. # 2.Use the processing bar to show the progress of the weighing # 3.When the target value of 99% is reached, a command is given to # myCobot to perform a stop operation. # date: 2022-11-10 # version: 0.2 # Joint Adjustment:Combined with the myCobot button and release #action #============ from tkinter import * import tkinter.ttk import serial import time from pymyCobot.myCobot import myCobot from pymycobot.genre import Coord #====Global variable initialisation global val #Measured weight val=0.0 global iset #Scale factor, based on set values,setvalue/100 iset=5/5 global c_set #Input box to form weighing judgement criteria c_set=0.0 global action_flag action_flag=False # Set download maximum maxbyte = 100 #======myCobot initialization mc = myCobot('COM23',115200) mc.power_off() time.sleep(2) mc.power_on() time.sleep(2) print('is power on?') print(mc.is_power_on()) time.sleep(2) mc.send_angles([95.97,(-46.4),(-133.3),94.3,(-0.9),15.64],50) #Arm lift time.sleep(2) #================== #Serial port initialization try: arduino = serial.Serial("COM25", 115200 , timeout=1) except: print("Port connection failed") ReadyToStart = True #Show processing bar function def show(): mc.send_angles([95.6,(-67.2),(-130.3),101.9,(-2.2),23.11],50) #down # Set the current value of the progress bar progressbarOne['value'] = 0 # Set the maximum value of the progress bar progressbarOne['maximum'] = maxbyte # Calling the loading method loading() #Process functions def loading(): global byte global val global action_flag c_set=setvalue.get() iset=100/float(c_set) #Calculation of scaling systems byte = arduino.readline().decode('utf-8') try: if len(byte) !=0 : val= byte else: pass except: pass if (1-(float(c_set)-float(val))/float(c_set))>=0.99 and action_flag==False: #Control myCobot movement when the remaining value is less than 5% print("triger") mc.send_angles([95.97,(-46.4),(-133.3),94.3,(-0.9),15.64],50) #up action_flag=True #Make sure you only act once, unless RESET # Set the progress of the processing bar pointer progressbarOne['value'] =(1-(float(c_set)-float(val))/float(c_set))*100 #float(val)*iset #Display of implementation weighing data in label4 strvar.set(str(float(val))) # Call the loading method again after 100ms progressbarOne.after(20, loading) #reset button callback function def reset_click(): global action_flag action_flag=False #Reset flag word to prepare for the next action pass #Reset flag word to prepare for the next action def ok_click(): show() pass #UI design=========== #Main window win = tkinter.Tk() win.title("mycobot") #Create a frame form object frame = tkinter.Frame (win, borderwidth=2, width=450, height=250) # Fill the form horizontally and vertically frame. pack () #Create "Position 1" Label1 = tkinter.Label ( frame, text="Set value (g)") # Using place, set the position of the first label from the upper left corner of the form (40,40) and its size (width, height) # Note that the (x, y) position coordinates here refer to the position of the upper left corner of the label (absolute positioning is performed with the upper left corner of NW, and the default is NW) Label1.place (x=35,y=15, width=80, height=30) # set data input setvalue setvalue = tkinter.Entry (frame, text="position2",fg='blue',font=("微软雅黑",16)) #,bg='purple',fg='white') #Use the upper right corner for absolute positioning, and the position is (166, 15) away from the upper left corner of the form setvalue.place(x=166,y=15, width=60, height=30) # set tab 3 Label3 = tkinter.Label (frame, text="Real Value (g)") #,bg='green',fg='white') # Set the horizontal starting position to 0.6 times the horizontal distance of the form, the absolute vertical distance is 80, and the size is 60, 30 Label3.place(x=35,y=80, width=80, height=30) # Set label 4, place the measured weight value, the default is 0.0g strvar = StringVar() Label4 = tkinter.Label (frame, textvariable=strvar,text="0.0",fg='green',font=("微软雅黑",16)) #,bg='gray',fg='white') # Set the horizontal starting position to 0.01 times the horizontal distance of the form, the absolute vertical distance to 80, set the height to 0.5 times the form height ratio, and set the width to 80 Label4.place(x=166,y=80,height=30,width=60) progressbarOne = tkinter.ttk.Progressbar(win, length=300, mode='determinate') progressbarOne.place(x=66,y=156) # Call a function using a button control resetbutton = tkinter.Button(win, text="Reset", width=15, height=2,command=reset_click).pack(side = 'left',padx = 80,pady = 30) # Call a function using a button control okbutton = tkinter.Button(win, text="OK", width=15, height=2,command=show).pack(side = 'left', padx = 20,pady = 30) #start event loop win. mainloop()Step5:
The program is debugged step by step:(1) Debug the electronic scale to ensure that the weighing is correct, and use weights for calibration. Make sure the datas are correct.
(2) Connect myCobot to the conveyor belt, and install a simple button at the end of myCobot, which can trigger the power supply of the conveyor belt when the arm is lowered.
(3) Joint debugging. Set the threshold in the GUI, trigger myCobot to drop the arm, and then the conveyor belt starts to run (parts are transported and fall into the hopper, weighed in real time), and trigger the myCobot to lift the arm after reaching the threshold (5g).
Summary
This is a simulated industrial application to demonstrate the control function of myCobot 280 Arduino. We transmit the weighing data to the PC through the sensor plus M5Stack Basic and indirectly feedback on the running status of the conveyor belt. Receive the weighing data to monitor the transportation of parts on the conveyor belt. When the threshold is reached, the myCobot will trigger the arm-lifting action.The program is elementary, and the host computer only has 150 lines. The difficulty is minimal and suitable for beginners to get started. Understanding, adjusting, and acquiring the robotic arm's electrical, mechanical, and parameters.
Thanks to Elephant Robotics' Drift Bottle Project for the myCobot 280 Arduino.
Article from:https://www.arduino.cn/thread-111757-1-1.html
-
-
The purpose of the mycobot in this project is just to press switches is it?
-
Not quite correct, it is the computer that is needed to transfer the data and send the commands to mycobot.