Creating a Synchronized Robotic Arm Demo: Step-by-Step Guide
-
Introduction
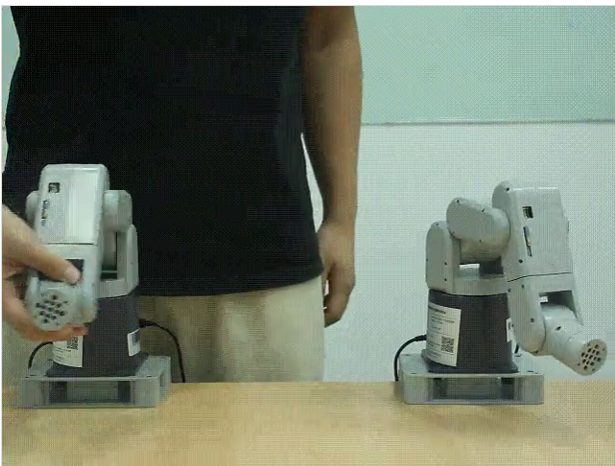
Today, I am going to present a robotic arm model that I have independently designed and implemented. The core feature of this model is to achieve real-time gesture tracking - just a gentle drag with your hand, and the robotic arm can immediately follow your movements.
The reason why I wanted to create such a model is that in some dangerous environments, we can use robotic arms to replace manual work, thereby avoiding threats to human life.
You might ask, why not directly use remote keyboard control, joystick control, or APP control, but choose to manually drag? I believe that only manual operation can satisfy our need for precision to the greatest extent. Therefore, I decided to start trying to make this model and have initially completed the entire demo.
I hope that through this demo, I can demonstrate the infinite possibilities of robotic arms to everyone, and at the same time, I hope to inspire everyone's infinite longing for future technology.
Robotic Arm
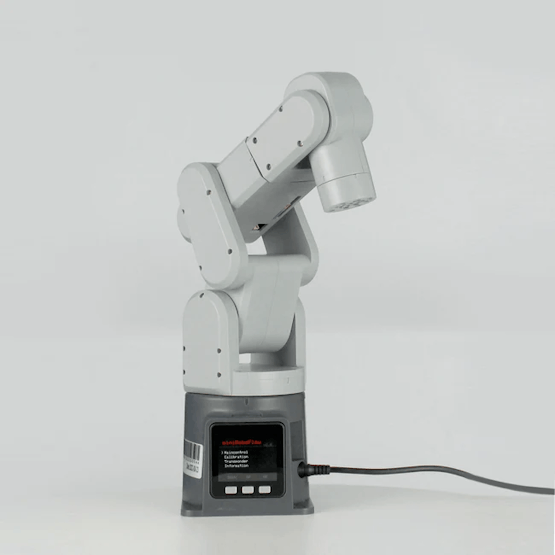
The mechArm 270 is a 6 DOF robotic arm, with a compact structure design that can fit into a backpack for easy transportation. Importantly, it has many open control APIs, which allows you to quickly start controlling the robotic arm using Python. There are no complicated operations, and it even supports graphical programming, which allows people who are not very familiar with code to quickly get started with controlling the robotic arm.
The mechArm is a desktop robotic arm with a structure that mimics industrial designs. Its maximum working radius is 270mm, it can carry a load of 250g, and its repeat positioning accuracy is controlled within ±0.5mm.Project
After introducing the basic equipment, let's start with the record of how I created this demo.
Environment:
Operating system: Windows 11Programming language: Python 3.9+
Python libraries: pymycobot, time
pymycobot is an open-source library for Elephant Robotics, specifically designed to control the robotic arm of Elephant Robotics. Here is an example of a simple control code.
Code:
#Main methods used

#Create objects to communicate with the robotic arm.
MyCobot(serial,baud)
# angles control robot,
send_angles([list_angles],speed)
# coords control robot
send_coords([list_coords],speed,mode)

Example:

import time
from pymycobot.mycobot import MyCobot

# create a object
mc = MyCobot("com7",115200)

# angles control
mc.send_angles([0,0,0,0,0,0],100)
time.sleep(1)
mc.send_angles([90,90,90,90,90,90],100)
time.sleep(1)
I briefly introduced how to use python to control mechArm. Isn’t it easy?
Problem Analysis
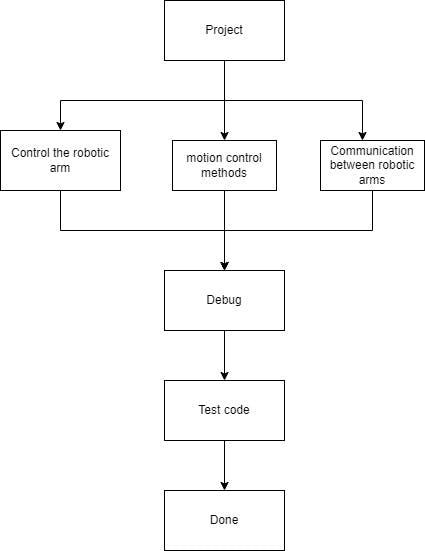
Before starting the project, it's important to set up a framework and understand the specific problems we need to solve. For this, I made a flowchart of the project. In the following, I will refer to the manually controlled robotic arm as R1, and the following motion robotic arm as R2.
Control Robotic Arm: As mentioned above, the robotic arm can be controlled using the methods provided by the pymycobot library.Motion Control Methods: The R1 robotic arm can be dragged by hand, returning the current angle information of the robotic arm at all times. The R2 robotic arm controls based on the angle information received from R1.
Communication Between Robotic Arms: This step is quite important in the entire project. Once established, the robotic arm can easily implement information transmission.
Next, I will mainly explain the Motion Control Methods and Communication Between Robotic Arms.
Motion Control methods
- Get real-time angle information
pymycobot provides the "get_angles()" method to obtain the angle information of the current robot arm.
# Can obtain the current angle information of the robotic arm in real time get_angles() # example print("real-time angles:",mc.get_anlges()) result: real-time angles:[0,0,0,0,0,0] # Continuously obtain the current angle while True: angels = mc.get_angles() print(angles) time.sleep(0.1) #Go to the next step every 0.1s- Set the Refresh Mode for the Robotic Arm
The refresh mode of the robotic arm mainly falls into two categories: interpolation mode and non-interpolation mode. These refer to the ways in which the end effector of the robotic arm is controlled during motion trajectory planning. If no mode is set, the robotic arm may not be able to perform the expected motion correctly, which may lead to the following consequences:
-
Unsmooth motion
-
Inaccurate motion
-
Discontinuous motion
Interpolation Mode: The interpolation mode can realize smooth and continuous trajectory planning, ensuring that the position and posture of the end effector of the robotic arm transition smoothly during the motion process.
Non-Interpolation Mode: The non-interpolation mode means that the robotic arm only focuses on specific target points during the motion process, without performing interpolation calculations. Under the non-interpolation mode, the position and posture of the robotic arm will jump directly between key points, without undergoing a smooth transition.
When multiple robotic arms use the interpolation mode for motion at the same time, there may be situations of waiting or queuing. Therefore, we choose to use the non-interpolation mode.
#Set refresh mode
set_fresh_mode(1/0)
1:no interpolation
0:interpolation

mc.set_fresh_mode(1)
Our code that integrates the previous ones is as follows.
Code:
import time
from pymycobot.mycobot import MyCobot

mc = MyCobot("COM7", 115200)    #release arm
mb = MyCobot("COM11", 115200)   #move arm

mb.set_fresh_mode(1)    #no interpolation
time.sleep(1)
mc.release_all_servos() #release robot
time.sleep(1)
speed = 100
while True:
    angles = mc.get_angles()    #get release arm angles
    mb.send_angles(angles, speed)   #send angles to move arm
    time.sleep(0.1)
## Communication between robotic arms:
Our solution is to connect two robotic arms to the same PC and connect them through a serial port.

# build connection
from pymycobot.mycobot import MyCobot

mc = MyCobot("COM7", 115200)
mb = MyCobot("COM11", 115200)
By using the most basic USB data cables for connection, we have two serial port numbers for the robotic arms on our computer, and we can send instructions to them separately.
https://www.youtube.com/watch?v=NByjgoqc2O4Summary
From the content, it can be seen that although we can achieve about 70-80% synchronization, there are other factors that can cause significant delays. The reasons for the delays could be various, such as the speed of data processing and transmission, the reaction speed of the robotic arm, software optimization, hardware performance, etc. All of these are potential factors that can cause delays.
In addition, there is a significant limitation in that their communication is connected through serial ports. If the distance is a bit further, this method cannot be used, and its practicality is not strong. In the future, I will try to use wireless connections such as Bluetooth and WiFi to control the robotic arm.