MQTT config for AWS IoT Core - SOLVED
-
Does anyone have a working configuration for MQTT and AWS IoT core? Micropython code would be really helpful. I have my certificate and private key uploaded to the device but am not sure where it's failing. Here is how my code looks:
while True: m5mqtt = M5mqtt('m5stack', 'iot.us-west-2.amazonaws.com', 1883, '', '', 300, ssl = True, ssl_params = {'key': "/flash/res/m5.key", 'cert': "/flash/res/m5.crt"}) m5mqtt.start() m5mqtt.publish(str('test'),str('hello world')) wait(1) wait_ms(2) wait(1) wait_ms(2) -
This took me way too long to figure out so here is a simple step by step guide for anyone else who's struggling with this:
AWS Setup
- Log onto your AWS account and pick a supported region for your IoT device. For example:
https://us-west-2.console.aws.amazon.com/iot/home?region=us-west-2#/thinghub - Click on Secure > Policies.
- Create a new policy and edit it in advanced mode. We're going to create a simple, open policy that is appropriate for development and experimenting. You can name your policy
m5stack. Fill the policy contents with this JSON:
{ "Version": "2012-10-17", "Statement": [ { "Effect": "Allow", "Action": "iot:*", "Resource": "*" } ] }- Click on 'Things' and then click 'Create'.
- Click on 'Create a Single Thing'.
- Give your thing a name. Example:
m5stick - You can leave the type, group, and attributes settings blank for now. Click Next.
- Click on the top 'Create Certificate' button.
- Download the cert file and the private key file. You do not need the public key file. Rename these as simply
cert.pemandpriv.key. The shorter names are important as they can't be longer than 10 characters. - Click the 'Activate' button.
- Click 'Attach a Policy'. Attach the m5stack policy you created in the previous step. Click 'Register Thing'.
AWS Monitoring
Now you're ready to monitor for published messages.
- Click on the 'Test' link on the left side of the page.
- Enter
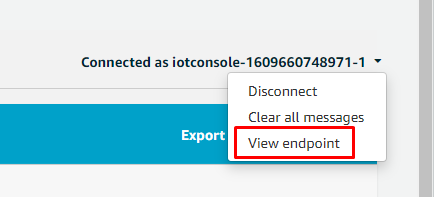
#in the Subscription topic. This is a wildcard that will receive all messages for all topics. Click 'Subscribe to Topic'. - View your endpoint. You can find it in the pulldown menu on the upper right:
UIFlow configuration
Finally you can upload your cert and key onto your device, and create some UIFlow code.
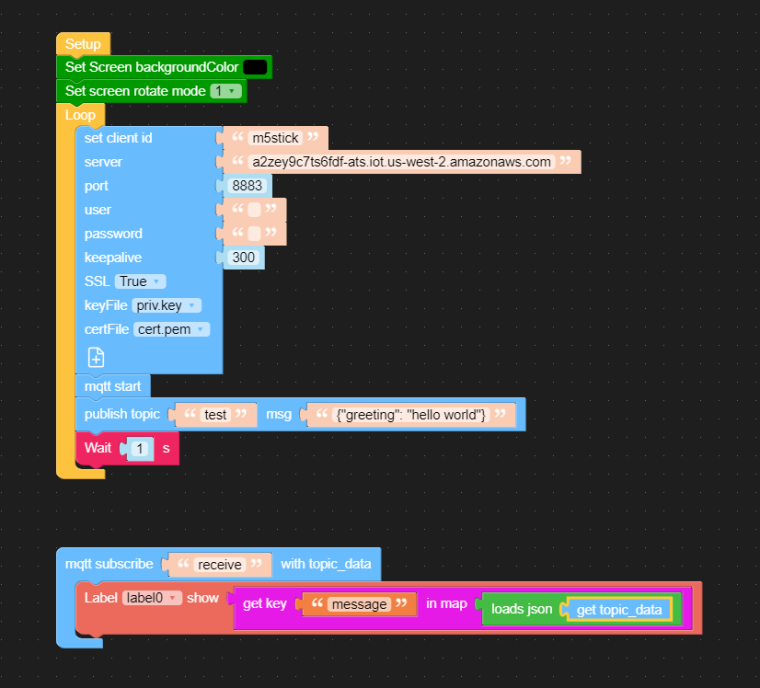
- Connect your device to UIFlow. Create a new MQTT block that looks like this, using your own URL:
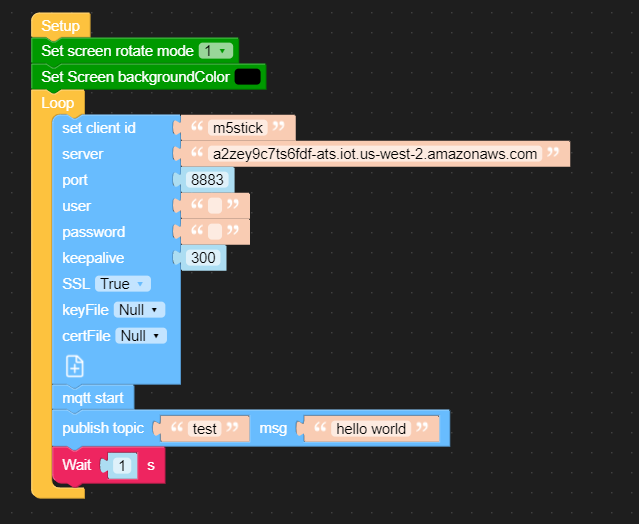
- Change the port to
8883. This is important, don't forget it. AWS runs MQTT on a non-standard port. - Click on the plus icon to upload your cert.pem and priv.key files onto your device. They will then be available in the pulldown menus.
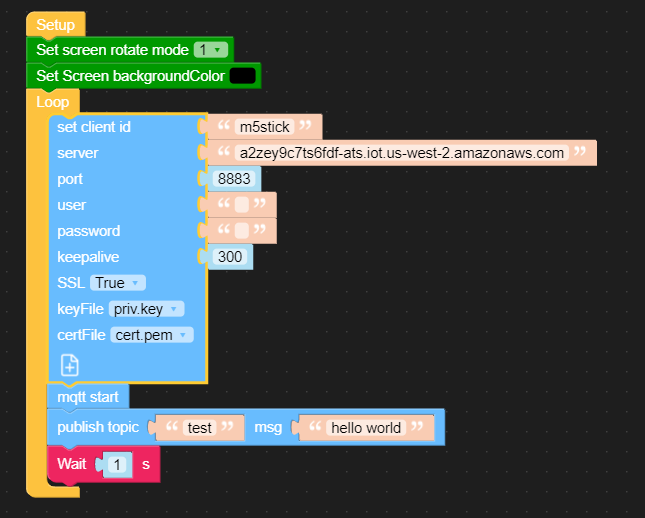
- Finally, run the code on your device. You will now begin to see "hello world" messages appearing in the queue every second:
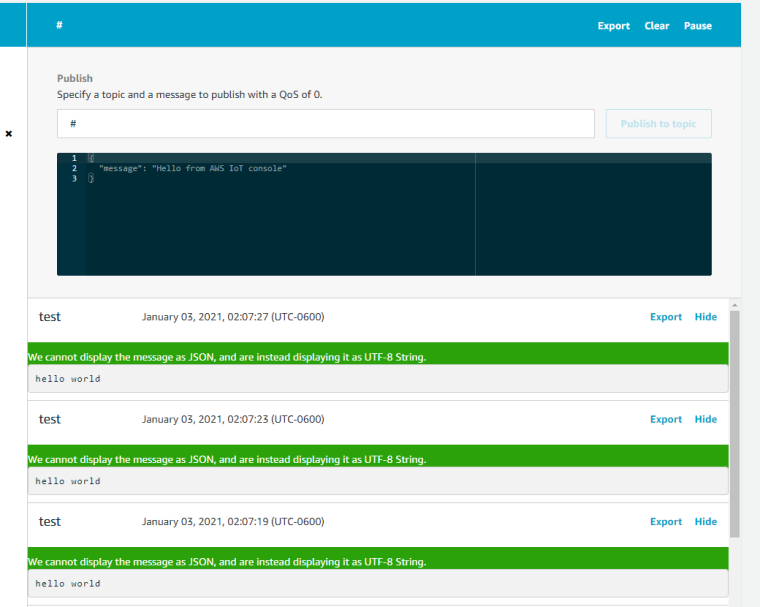
Here's one last screenshot that includes an example of how to subscribe to messages on your device. In this example you'd Publish a test message to the 'receive' topic. Just make sure you have a label0 somewhere on the screen.
- Log onto your AWS account and pick a supported region for your IoT device. For example:
-
@greenleaf This is an excellent tutorial, I was able to follow through with it really well. I can subscribe to the "test" topic on AWS and it is coming through regularly, but I am not able to receive a published topic "receive" on the device. It could be the internet service. ATT has been sketchy here in Georgia the past couple days.
I was able to get the device to receive a couple times, but it seeks to be intermittent Again, thinking it's the sketch internet. Need to feed the squirrels in the router again or something.
Thanks for posting this. I can see how this can be useful.
-
@greenleaf I've played around with it more tonight and the receipt of the publish on the device seems really random. I turned it on and sent 3 messages back to back and then nothing. I wonder if it has something to do with the port 8883.
-
Trying out the new AWS blocks but only getting
MQTTException -> Server close socket link