Navigation

    M5Stack Community

    • Register
    • Login
    • Search
    • Categories
    • Recent
    • Tags
    • Popular
    • Users
    • Groups
    • Search
    1. Home
    2. greenleaf
    • Continue chat with greenleaf
    • Start new chat with greenleaf
    • Flag Profile
    • Profile
    • Following
    • Followers
    • Blocks
    • Topics
    • Posts
    • Best
    • Groups
    Save
    Saving

    greenleaf

    @greenleaf

    2
    Reputation
    16
    Posts
    134
    Profile views
    0
    Followers
    0
    Following
    Joined Last Online
    Location Middle Earth Age 121

    greenleaf Follow

    Posts made by greenleaf

    • Building Core2 FactoryDemo in PlatformIO

      If anyone else is trying to do this you'll need to fix your partition table to take advantage of the larger memory. The steps how to do this are:

      1. Go to PIO Home in Visual Studio Code
      2. Click on +New Project
      3. Name it m5core2 or similar. Choose M5Stack Core ESP32 for the board.
      4. Leave Framework set to Arduino.
      5. Open your platformio.ini file and replace the text with this:
      [env:m5stack-core-esp32]
      platform = espressif32
      board = m5stack-core-esp32
      framework = arduino
      ; [[[for macos]]]
      ;upload_port = /dev/cu.SLAB_USBtoUART
      ; [[[fix PSRAM size and you won't need have this file]]]
      board_build.partitions = default_16MB.csv
      build_flags =
          -DBOARD_HAS_PSRAM
          -mfix-esp32-psram-cache-issue
      
      1. Copy the 16MB partition table file into your src directory. You can download this file here:

      https://github.com/espressif/arduino-esp32/blob/master/tools/partitions/default_16MB.csv

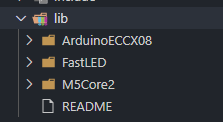
      1. In the 'lib' directory you will need three libraries.
        FastLED - https://github.com/FastLED/FastLED
        M5Core2 - https://github.com/m5stack/M5Core2
        ArduinoECCX08 - This one is in a zip file in the M5Core2 library repo:
        https://github.com/m5stack/M5Core2/blob/master/examples/core2_for_aws/ArduinoECCX08.zip

      Your lib directory should look like this when you're done:
      0_1609802773703_40f76186-abcc-4a68-916a-468a37b4451a-image.png

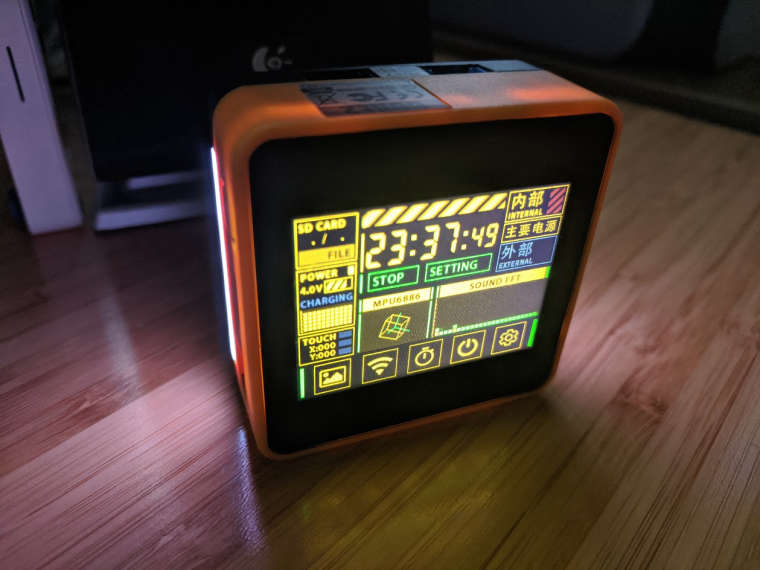
      1. Now copy everything from the example FactoryTest directory in the M5Core2 library into your src folder. The directory files can be viewed here:

      https://github.com/m5stack/M5Core2/tree/master/examples/core2_for_aws/FactoryTest

      1. Rename FactoryTest.ino to main.cpp

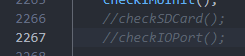
      2. Edit main.cpp and comment out these two lines with //. These tests will fail if you don't have an SDCard or something plugged into the IO port.

      0_1609802944350_e768774e-f0f1-419b-a751-2b40e2db3122-image.png

      1. Connect your M5Core2 and build/upload. You can do CTRL-Shift-P to find the Platformio:Upload option.

      2. Play with the cool factory demo!

      0_1609803302370_m5.jpg

      Thanks to jokercatz for the tip on fixing the platform:
      http://jokercatz.blogspot.com/2020/11/m5stack-core2-build-from-platformio.html

      posted in Core2 for AWS
      greenleaf
    • RE: Control NeoPixels on M5Stack Core2 AWS edukit

      It looks like these LEDs are not supported in UIFlow, and the NeoPixel micropython library didn't work.

      I was able to build new firmware using PlatformIO and flash the FactoryTest application here:

      https://github.com/m5stack/M5Core2/tree/master/examples/core2_for_aws/FactoryTest

      This has an example of using the FastLED library to control these RGB LEDs.

      posted in UIFlow
      greenleaf
    • Control NeoPixels on M5Stack Core2 AWS edukit

      I flashed my M5Stack Core2 AWS edukit version with UiFlow.

      The docs indicate that the SK6812 LEDs are controlled with GPIO25:

      SK6812-LED
      ESP32 Chip GPIO25
      SK6812-LED DATA

      I tried this code to test them out, and while the code runs without error, the lights never come on:

      from machine import Pin
      from neopixel import NeoPixel
      
      pin = Pin(25, Pin.OUT)  # Pin 25 to drive NeoPixels
      print("Creating NeoPixel object")
      np = NeoPixel(pin, 10)  # create NeoPixel driver on GPIO25 for 10 pixels
      np[0] = (255, 0, 0)     # set first pixel red, full brightness
      np[1] = (0, 128, 0)     # second pixel green, half brightness
      np[2] = (0, 0, 64)      # third pixel blue, quarter brightness
      np[3] = (255, 255, 255)
      np[4] = (255, 255, 255)
      np[5] = (255, 255, 255)
      np[6] = (255, 255, 255)
      np[7] = (255, 255, 255)
      np[8] = (255, 255, 255)
      np[9] = (255, 255, 255)
      np.write()              # write data to all pixels
      print("done")
      

      Anyone have ideas how to access these LEDs with micropython?

      posted in UIFlow
      greenleaf
    • RE: AWS EduKit restore factory firmware

      In the meantime if you want to play around with AWS and MQTT I wrote up this how to guide for setting it up in UIFlow:

      https://community.m5stack.com/topic/2688/mqtt-config-for-aws-iot-core-solved

      You can both publish and subscribe to topics if you follow those steps. You do need to flash your device with the UIFlow image though.

      posted in Core2 for AWS
      greenleaf
    • RE: Publish mqtt to AWS Iot from UiFlow

      I am also stuck trying to get this to work. Some research reveals that there may be a ca_certs parameter required to include Amazon's root CA. I've tried it like this but no luck:

      while True:
        output.setText('Setting up mqtt')
        m5mqtt = M5mqtt('m5stick', 'a2zey9c7ts6fdf-ats.iot.us-west-2.amazonaws.com', 1883, '', '', 300, ssl = True, ssl_params = {'key': "/flash/res/priv.key", 'cert': "/flash/res/cert.pem", 'ca_certs': "/flash/res/ca.pem"})
        m5mqtt.subscribe(str(''), fun__)
        output.setText('starting mqtt')
        m5mqtt.start()
        output.setText('publishing hello world')
        m5mqtt.publish(str('test'),str('hello world'))
        output.setText('sent hello world')
        wait(1)
        wait_ms(2)
      

      Can anyone from m5stack confirm whether ca_certs is a supported ssl parameter?

      posted in UIFlow
      greenleaf
    • RE: MQTT config for AWS IoT Core - SOLVED

      This took me way too long to figure out so here is a simple step by step guide for anyone else who's struggling with this:

      AWS Setup

      1. Log onto your AWS account and pick a supported region for your IoT device. For example:
        https://us-west-2.console.aws.amazon.com/iot/home?region=us-west-2#/thinghub
      2. Click on Secure > Policies.
      3. Create a new policy and edit it in advanced mode. We're going to create a simple, open policy that is appropriate for development and experimenting. You can name your policy m5stack. Fill the policy contents with this JSON:
      {
        "Version": "2012-10-17",
        "Statement": [
          {
            "Effect": "Allow",
            "Action": "iot:*",
            "Resource": "*"
          }
        ]
      }
      
      1. Click on 'Things' and then click 'Create'.
      2. Click on 'Create a Single Thing'.
      3. Give your thing a name. Example: m5stick
      4. You can leave the type, group, and attributes settings blank for now. Click Next.
      5. Click on the top 'Create Certificate' button.
      6. Download the cert file and the private key file. You do not need the public key file. Rename these as simply cert.pem and priv.key. The shorter names are important as they can't be longer than 10 characters.
      7. Click the 'Activate' button.
      8. Click 'Attach a Policy'. Attach the m5stack policy you created in the previous step. Click 'Register Thing'.

      AWS Monitoring

      Now you're ready to monitor for published messages.

      1. Click on the 'Test' link on the left side of the page.
      2. Enter # in the Subscription topic. This is a wildcard that will receive all messages for all topics. Click 'Subscribe to Topic'.
      3. View your endpoint. You can find it in the pulldown menu on the upper right:

      0_1609660966279_view_endpoint.png

      UIFlow configuration

      Finally you can upload your cert and key onto your device, and create some UIFlow code.

      1. Connect your device to UIFlow. Create a new MQTT block that looks like this, using your own URL:

      0_1609661085404_example.png

      1. Change the port to 8883. This is important, don't forget it. AWS runs MQTT on a non-standard port.
      2. Click on the plus icon to upload your cert.pem and priv.key files onto your device. They will then be available in the pulldown menus.

      0_1609661203820_example2.png

      1. Finally, run the code on your device. You will now begin to see "hello world" messages appearing in the queue every second:

      0_1609661277903_b0bd34a6-fc22-48f9-9eab-2d3331e803a3-image.png

      Here's one last screenshot that includes an example of how to subscribe to messages on your device. In this example you'd Publish a test message to the 'receive' topic. Just make sure you have a label0 somewhere on the screen.

      0_1609664735105_6227262f-c431-4a03-b840-2822e018980d-image.png

      posted in Lessons and Guides
      greenleaf
    • MQTT config for AWS IoT Core - SOLVED

      Does anyone have a working configuration for MQTT and AWS IoT core? Micropython code would be really helpful. I have my certificate and private key uploaded to the device but am not sure where it's failing. Here is how my code looks:

      while True:
        m5mqtt = M5mqtt('m5stack', 'iot.us-west-2.amazonaws.com', 1883, '', '', 300, ssl = True, ssl_params = {'key': "/flash/res/m5.key", 'cert': "/flash/res/m5.crt"})
        m5mqtt.start()
        m5mqtt.publish(str('test'),str('hello world'))
        wait(1)
        wait_ms(2)
        wait(1)
        wait_ms(2)
      

      Re: Connecting to AWS IoT Core

      posted in Lessons and Guides
      greenleaf
    • RE: AWS EduKit restore factory firmware

      @ksprayberry I must confess, I stopped the tutorial after getting Blinky Hello World working. I ended up flashing the device with UIFlow instead as it's much more user friendly.

      posted in Core2 for AWS
      greenleaf
    • RE: AWS EduKit restore factory firmware

      @ksprayberry Don't feel bad, I slipped on the exact same banana peel. Writing technical workshop documentation is hard. I've been sending suggestions to the developer on github with some ideas about how to make this easier for new users.

      What would be really amazing is the UIFlow experience, but with the AWS features enabled. Maybe someone could whip up a micropython module that would handle the AWS registration and key exchange interactively.

      posted in Core2 for AWS
      greenleaf
    • RE: AWS EduKit restore factory firmware

      @ksprayberry Make sure you are in the correct AWS region. The test button on the MQTT page won't throw any errors or output if you're not in the correct region.

      posted in Core2 for AWS
      greenleaf