Help Creating a Timer

-
Hi Guys
OK, I ve tried my rookie best!I'm am trying to create a system type timer to call on a button press or possible other function but it has to measure actual TIME! My goal was actually to try and re-create something very similar to the countdown timer in the Core2 demo but obviously just running the time ever increasing until called to stop.
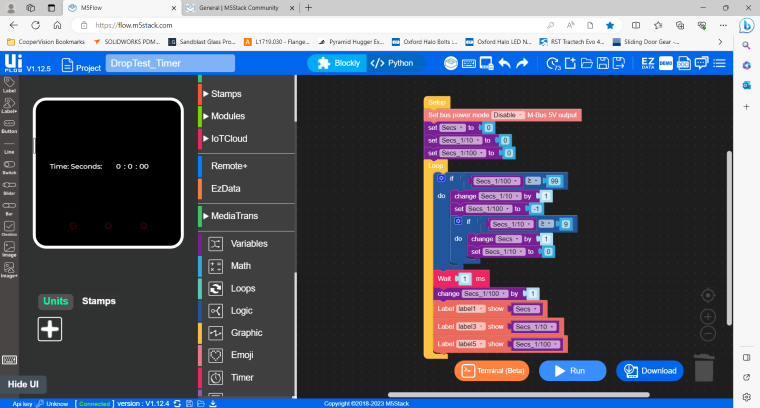
I just want to run a stopwatch type clock on the screen running 1/100th's, 1/10th's and full seconds. The timer will start when a ball is released and stop when it is detected by a sensor.
My rookie code is below and I think it is running how I expect but not linked to actual time i.e. its just counting numbers and not tied to the system or a real time clock.
Could anybody tell me and explain what am I doing wrong please, maybe even show me what the code should look like :)
Any help advice etc would be greatly appreciated.
Adie
-
Hi Adie,
I don't think you are doing something wrong but there is not enough code to have a stopwatch
and as you say you need to link the code to system time. As you want to measure quite small durations, I would recommend you use the function "Get tick ms" that is available from the Timer section. You need to read the value at the start of your timing operation and again at the end.
By difference you get the duration. You then need to transform this duration in seconds, 1/10th and 1/100th
Once you are there, you need to define the start and stop, button pressed or detection by a sensor -
@csierra67
Thank you for your reply.I ve been looking at the get tick ms function but really no idea how to use or programme it and can find no examples.
I also figured out after hours (yeah I’m not very good) how to write an actual software timer whoop whoop! This appears to be on time as best I can tell but if I call the timer loop any quicker than 100ms it all goes Pete tong and random numbers and sequences seem to get generated. 1/10th, seconds and minutes at 100ms is the fasted stable timer I can get. I’m guessing the processor power is just not there to even run the timer that quick??
As you say the tick function is the way to go but not something I can figure out on the Arduino is reasonably straight forward to use but I’m not finding that so here.
Given the nature of programming and the use of timers I’m amazed there are not more or options or better examples. The absence of a system clock within the unit baffles me :)
Thank for your help
Adie -
Hi Adie,
Two comments.
The accuracy of any timer at the 1/100th second level is difficult to assess. You would need a reference timer and connect the start and stop signal both to this timer and to the M5stack /ESP32 based on timer
Absence of a sytem clock. Actually there is one M5 Core 2, its RTC but it reports only seconds, minutes, hours, days.. On the other entry level Core models, there is none but you can add an RTC units that will provide the functionality
Csierra67 -
@csierra67 said in Help Creating a Timer:
Hi Adie,
Two comments.
The accuracy of any timer at the 1/100th second level is difficult to assess. You would need a reference timer and connect the start and stop signal both to this timer and to the M5stack /ESP32 based on timer
Absence of a sytem clock. Actually there is one M5 Core 2, its RTC but it reports only seconds, minutes, hours, days.. On the other entry level Core models, there is none but you can add an RTC units that will provide the functionality
Csierra67@csierra67
Thank you again.
I believed the RTC is just a link to an outside website for the data so not suitable for system timing references ..but probably wrong.Considering they promote the use of the M5Stack system for light industrial application a reliable link to the processor clock in 'ms' is vital but clearly my expectations are a little high of the Core2 having moved from learning the Arduino platform. Just for reference the below is the code I was trying to port across to the Core2 albeit it uses a relay and electro magnet for ball release where as I am now trying to move to servo release.
Thanks again for your comments and sort of confirming the the Core 2 and me is a combination not up to much :).
Kind regards
Adie
// Grove - LCD RGB Backlight - Version: Latest
#include <Wire.h>
#include "rgb_lcd.h"rgb_lcd lcd;
      const int colorR = 255;
      const int colorG = 0;
      const int colorB = 0;
uint32_t btn_tStart,
btn_tStartOld,
sensor_tStart,
tStart_ballRelease;const byte pinBtn = 2, // pin number button connected to.
pinSensor = 3, // pin number sensor connected to.
pinRelay = 4, // pin number relay connected to.
debounceTimeBtn = 5; // debounce time for button. msecbool pinBtnState = true, // instantanious button state (noisy!)
pinBtnStateOld = true, //
btnStateDb = true, // debounced button state last loop
btnStateDbOld = true, // debounced button state this loop
btnLatch = false, //
btnLatchOld = false, //
sensorStateDbOld= true, // debounced sensor state last loop
sensorStateDb = true, // debounced sensor state this loop
ballDetected = false;void setup() {
Serial.begin(9600);
pinMode(pinBtn ,INPUT_PULLUP);
pinMode(pinSensor ,INPUT_PULLUP);
pinMode(pinRelay ,OUTPUT);//set up the LCD's number of columns and rows:
lcd.begin(16,2);
lcd.setRGB(colorR, colorG, colorB);
lcd.print("Press Start");btn_tStartOld = 0;
}void loop() {
// read inputs and debounce.
debounceBtn(); //debounce button signal
sensorStateDb = digitalRead(pinSensor); //debounce not required// make decisions and set outputs doStuff();//update loop states for next round.
btnStateDbOld = btnStateDb;
sensorStateDbOld = sensorStateDb;
}void debounceBtn() {
pinBtnState = digitalRead(pinBtn); // get state of pin 2if(pinBtnStateOld != pinBtnState)
{
btn_tStart = millis(); // reset db timer
pinBtnStateOld = pinBtnState; // now they are equal, won't enter
} // here again unless pin state changes
if (millis() - btn_tStart > debounceTimeBtn) // db timer has elapsed
{
btnStateDb = pinBtnState; // button state is valid
}
}void doStuff(){
if(btnStateDb != btnStateDbOld && btnStateDb == true) // btn pressed
{
btnLatch = !btnLatch; // toggle latch
digitalWrite(pinRelay,btnLatch); // set relay on/off
if(btnLatch)
{
lcd.clear();
lcd.setCursor(0, 0);
lcd.print("Magnet On");
//Serial.println("Magnet Energised");
ballDetected = false; // reset latch
}
else
{
tStart_ballRelease = millis();
lcd.setCursor(0, 0);
lcd.print("Ball Released ");
//Serial.println("ball released");
}
}if(sensorStateDb != sensorStateDbOld && !sensorStateDb && !btnLatch && !ballDetected) // sensor sensed.
{
Serial.println("msecs since ball release: "+ String(millis()-tStart_ballRelease));
lcd.setCursor(0, 0);
lcd.print("Ball Detected");lcd.setCursor(0, 1); lcd.print(millis()-tStart_ballRelease); ballDetected = true; // set latch}
}
Hello! It looks like you're interested in this conversation, but you don't have an account yet.
Getting fed up of having to scroll through the same posts each visit? When you register for an account, you'll always come back to exactly where you were before, and choose to be notified of new replies (either via email, or push notification). You'll also be able to save bookmarks and upvote posts to show your appreciation to other community members.
With your input, this post could be even better 💗
Register Login