M5stack core2 control 12 channel Servo module
-
Hi,
I'm using M5stack core2 and 12 channel servo module (https://docs.m5stack.com/en/module/servo) to control servo motors.
I plug the servo module onto the m5stack core2 and use the code (https://github.com/m5stack/M5Core2/blob/master/examples/Module/SERVO/SERVO.ino)
but the servo motor, does not work properly, the motor works fine with other drivers.
I guess there might be some problem with the code.
could you please help to check if the M5stack core2 could work with the Servo module?
thank you.
-
Hello @LishengKKK
try changing this line:
Wire.begin(32, 33, 100000UL);to:
Wire.begin((int) 32, (int) 33, 100000UL);Thanks
Felix -
@felmue thank you.
I changed the code as you suggested, but the servo still doesn't work.
could you please share the code which works well on your side?
thanks again.
-
Hello @LishengKKK
my suggestion is based on other examples using I2C where the original code would initialize an I2C slave instead of an I2C master due to some recent changes in the ESP32 Arduino framework.
I am sorry, but I don't have working code to share as I don't have the necessary hardware to test (e.g. I don't have a Servo module). Sorry.
Thanks
FelixGPIO translation table M5Stack / M5Core2
Information about various M5Stack products.
Examples -
@felmue Hi, I see a number of posts where the fix is adding (int) twice in the function’s parameters.
It seems the parameters are already correct, can you help me understand what difference this makes?
-thanks, Terry -
thanks a lot, but I still can not fix the problem, now I change to use another controller instead of core2.
-
Hello @LishengKKK
please try this - leave
Wire.begin()as it is but replaceWirewithWire1in the two functionsServo_write_us90()andServo_write_angle().Explanation: M5Core2 uses
Wire1for the internal I2C andWirefor the external I2C (Groove port).Wire1is initialized inM5.begin()and used for the touch screen.Thanks
Felix -
Hello @teastain
Wire.begin()used to always initialize an I2C master, but in recent ESP32 Arduino framework versions an ESP32 can also be setup as I2C slave. But instead of creating a new function likeWire.beginSlave()it has been decided to overload the already existingbegin()function so it can be used to initialize an I2C master or a slave.The compiler / linker decides from the argument types which begin function to call. The I2C master begin function is defined like this:
bool begin(int sda, int scl, uint32_t frequency=0);And the I2C slave begin function is defined like this:
bool begin(uint8_t slaveAddr, int sda, int scl, uint32_t frequency);Now if you call
Wire.begin(SDA, SCK)andSDAandSCKare defined asuint8_tthe I2C slave begin is called (instead of the intended I2C master begin) since the argument types match better.Thanks
FelixP.S.: my original advise to typecast the arguments to
(int)was useless as numbers are already defined asint. -
@felmue
thank you very much, follow your tips, now the M5stack cores can work with the 12-channel servo. -
Hello @LishengKKK
cool. I am happy to hear you got it working. Thank you for reporting back.
Thanks
Felix -
Hi, @felmue
Meanwhile, I got a reply from the 'support@m5stack.com'
they provided another solution.....
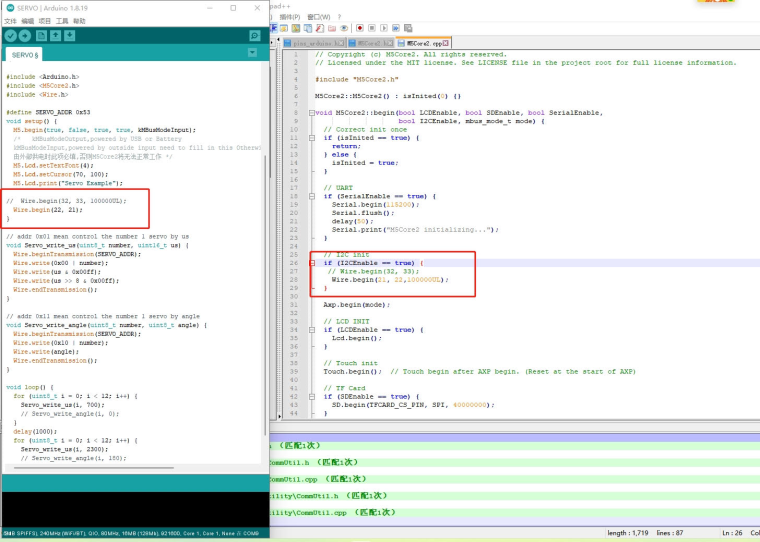
in the M5stack core2 library (~/Arduino/libraries/M5Core2/src),
in the class 'void M5Core2::begin'
change
' // I2C init
if (I2CEnable == true) {
Wire.begin(32, 33);
}'to
' // I2C init
if (I2CEnable == true) {
Wire.begin(21, 22, 100000UL);
}'
then in the arduino code:
add 'Wire.begin(22, 21);'then the core2 and 12-channel servo will work properly.
but the weird thing is that they still work even when I delete the line 'Wire.begin(21,22);' meaning delete all the 'Wire.begin(..,..);' in the void setup() .
this is a bit funny.
-
Hello! It looks like you're interested in this conversation, but you don't have an account yet.
Getting fed up of having to scroll through the same posts each visit? When you register for an account, you'll always come back to exactly where you were before, and choose to be notified of new replies (either via email, or push notification). You'll also be able to save bookmarks and upvote posts to show your appreciation to other community members.
With your input, this post could be even better 💗
Register Login