Root Cause Analysis
A detailed schematic review revealed the source of the problem.
All three components — Core2, Audio Module, and Bottom2 — are interconnected through the shared M5 BUS.
The Bottom2 module includes a SPM1423 MEMS microphone, which uses:
GPIO0 (BUS pin 24) for the clock signal (CLK)
GPIO34 (BUS pin 26) for the data signal (DAT, digital output)
The Audio Module, based on the ES8388 codec, uses:
GPIO0 (BUS pin 24) for I2S_MCLK
GPIO34 (BUS pin 26) for I2S_MAIN_DIN
This creates a fundamental hardware conflict on the I2S bus.
The Core Conflict
Two independent devices attempt to drive the same data line:
The ES8388 (M144 Audio Module) uses GPIO34 to send digitized audio data from its ADC (line-in or microphone) to the ESP32 via I2S.
The SPM1423 (Bottom2) uses the same GPIO34 to output PDM audio data from its internal MEMS microphone.
From the ESP32’s perspective:
GPIO34 is input-only
However, on the physical PCB traces, both devices are electrically connected to this same line and actively drive it.
This results in a classic and severe bus contention scenario:
Two outputs connected together
No arbitration
No isolation
No possibility for coexistence
Why This Cannot Be Solved in Software
At first glance, one might consider disabling the microphone via software. Unfortunately, this is not feasible due to both architectural and hardware constraints.
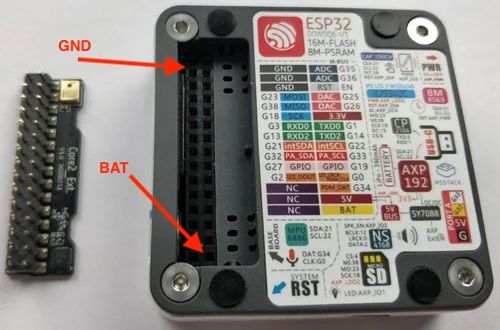
The Bottom2 doesn’t expose the SPM1423 MEMS dedicated enable/disable (chip select) pin.
The only way to silence it — effectively forcing its data output into a high-impedance (Hi-Z) state — is to stop its clock signal on GPIO0.
This leads directly to a deadlock:
If the M144 switch is set to position A:
GPIO0 is used as MCLK (mandatory master clock for ES8388 operation, typically 12.288 MHz)
If the switch is set to position B:
GPIO0 becomes I2S SCLK (bit clock)
Additionally:
The internal amplifier of the Core2 (NS4168) also uses GPIO0 for BCLK
In other words, GPIO0 is always actively used in any valid configuration.
Stopping the clock to disable the microphone would simultaneously break:
the ES8388 codec
or the Core2 internal audio path
Thus, there is no viable way to control the microphone via software without disrupting essential system functionality.
Design Oversight
The A/B switch on the M144 Audio Module was clearly designed to avoid clock conflicts (MCLK vs SCLK) with other peripherals.
However, the design completely overlooks the data line conflict on GPIO34.
This is particularly problematic because:
the Bottom2 module is an official M5Stack accessory
the SPM1423 microphone is always active by default
both modules are intended to be used within the same ecosystem
Despite this, their coexistence leads to a non-functional configuration when using the ES8388 input path.
Conclusion
This issue is not a matter of configuration, firmware, or library incompatibility. It is a fundamental hardware design conflict on the shared M5 BUS.
When Bottom2 is attached:
the SPM1423 microphone continuously drives the I2S data line
the ES8388 is unable to deliver valid audio data
the result is severe noise and corrupted signal
There is no reliable software workaround.
The only effective solutions are hardware-level:
physically removing or isolating the SPM1423 microphone
redesigning the Bottom2 PCB to include a switch or gating mechanism
routing the microphone control (e.g., SELECT or enable logic) to a dedicated GPIO
Until such changes are implemented, the ES8388 input functionality cannot be used in conjunction with the Bottom2 module in a stable and predictable way.
My solution was to remove the SPM1423 Microphone from the PCB.
Another solution is to cut the relevant pins from the Bottom2 BUS with the same effect - removing SPM1423 from the circuit.