TL;DR: The factory certificate in slot 10 is in a compressed format that AWS IoT rejects. You need to generate a new properly-formatted certificate. Full working example here: https://github.com/scarolan/grafana-core2aws-iot
The Problem Everyone Hits
If you've tried to use the Core2 for AWS with its built-in ATECC608 secure element, you've probably hit this error when registering the certificate:
CertificateValidationException: The certificate could not be parsed
You're not crazy. The factory certificate in slot 10 is stored in Microchip's compressed format with:
Empty issuer/subject fields
Invalid dates (Aug 28, 2005)
Missing X.509 structure
AWS IoT's register-certificate-without-ca API rejects it outright.
The Solution
Generate a new properly-formatted certificate that still uses the locked private key in slot 0 (so you maintain hardware security):
1. Clone the Working Example
git clone https://github.com/scarolan/grafana-core2aws-iot
cd grafana-core2aws-iot/extras/generate_cert
2. Flash the Certificate Generator
pio run -t upload --upload-port COM3
pio device monitor --port COM3 --baud 115200
3. Save the Certificate
Copy the certificate output (including -----BEGIN CERTIFICATE----- lines) to a file.
4. Register with AWS IoT
aws iot register-certificate-without-ca \
--certificate-pem file://device_new.pem \
--status ACTIVE \
--region us-east-1
Then attach your policy and thing as usual.
5. Use in Your Firmware
Update secrets.h with the new certificate and you're done!
Why This Works
The certificate generator:
Reads the public key from slot 0 (the private key never leaves the chip)
Creates a proper X.509 certificate with valid dates and subject fields
Signs it using the locked private key (signing happens inside the ATECC608)
Returns a properly-formatted certificate AWS IoT accepts
Hardware security is maintained - the private key in slot 0 is never exposed, it's just used differently.
Complete Documentation
I've documented the full solution with explanations of what's happening:
ATECC608 Architecture - How the secure element works, slot configuration, lock mechanism
Certificate Solution - Why the factory cert fails and how to fix it
Full Working Example - Complete vibration monitoring IoT demo with AWS IoT Core + Timestream
Why M5Stack Doesn't Document This
The compressed certificate format is a Microchip design decision (saves space on the chip). It's meant to work with:
Microchip's Trust Platform provisioning tools
Their specific certificate reconstruction libraries
Microchip-managed certificate authorities
It was never designed to work directly with third-party services like AWS IoT without special handling.
M5Stack provides a complex registration helper (registration_helper.py) that reconstructs the certificate with special manifest-based APIs, but it's 800+ lines of Python with tons of dependencies.
The approach above is much simpler - just generate a new cert and register it normally.
Tested and Working
This solution is running in production on my demo device:
MQTTS publishing to AWS IoT Core every 5 seconds
Data flowing to Amazon Timestream
Hardware-backed authentication with ATECC608
Zero issues with certificate validation
Hope This Saves Someone's Week
I fought with this for a week a couple years ago and gave up in frustration. Revisited it recently and finally cracked it. Hopefully this saves others the same pain!
Questions/issues? Comment here or open an issue on GitHub.
Repository: https://github.com/scarolan/grafana-core2aws-iot
Hardware: M5Stack Core2 for AWS
Libraries: ArduinoECCX08, ArduinoBearSSL, M5Unified
Tested: PlatformIO, Arduino framework on ESP32
I just got the M5GO Kit, and I'm trying to make a Voice Assistant. For some reasons, the Demo of the kit made me think that accessing the microphone is easy. But, after hours of finding, it seems that there is no library or support for the kit to record audio. Does anyone have any resource regarding this?
Problem:
Der Schrittmotor funktioniert nur korrekt in der Z-Achse bei normalen (langsamen) Drehgeschwindigkeiten.
Beim Versuch, die X- und Y-Achsen zu verwenden, funktioniert der Motor nur, wenn ich die Vorschubgeschwindigkeiten auf das 10-fache oder höher erhöhe.
Wenn ich versuche, die Adresse auf 0x71 zu ändern, wird das Modul nicht erkannt.
@samantha_martin Hola Samantha. El M5StickC Plus (SKU:K016-P) utiliza el chip ESP32-PICO-D4, que integra Bluetooth LE. Para reducir la latencia en la transmisión HID, puedes probar las siguientes acciones:
Optimizar la frecuencia de envío de datos: En las librerías ESP32-BLE-Keyboard o BleGamepad, ajusta el intervalo de notificación BLE a un valor más bajo (por ejemplo, 10-20 ms). Algunas librerías permiten configurar esto al inicializar el dispositivo HID.
Minimizar el código en el loop(): Asegúrate de que no haya delays innecesarios ni tareas bloqueantes (como impresiones Serial) que ralenticen la detección de botones y el envío de comandos.
Configurar el modo BLE de bajo consumo: Aunque el ESP32-PICO-D4 es eficiente, verifica que no se encuentre en modos de suspensión prolongada. Asegúrate de que el dispositivo BLE esté configurado para enviar notificaciones inmediatamente al detectar una pulsación.
Actualizar el firmware del ESP32: Usa la última versión del core ESP32 en Arduino IDE, ya que a menudo incluyen optimizaciones en el stack BLE.
Verificar la configuración de Android: En el menú de configuración de Bluetooth de tu teléfono, desactiva opciones como "Ahorro de batería" para el dispositivo M5StickC Plus, ya que pueden restringir la frecuencia de actualizaciones HID.
https://chat.m5stack.com/
If you're planning to use an external 1S LiPo with the M5Core2 through BUS pins 1 and 30, it's worth checking the board schematic first. The community confirmed that pin 30 is directly connected to VBAT, so an external battery with the same voltage can work. One important tip is to avoid connecting two rechargeable batteries in parallel without proper protection. Discussions like this are why I keep coming back to the M5Stack community, and even Laptop Giant enjoys following practical hardware insights like these.
@felmue
The tip has hit the problem. I have implemented a query of the key A in the callback routine after 1 ms. Only if the key is still pressed the routine is executed. Otherwise nothing is done. Now there are no more key presses from the ghost.
Thanks
I have downloaded that and it does work.
But, your documentation leaves so much to be desired / it would be great if this could be documented somewhere rather than in a git repo.
Some of us do read documentation / and don't necessarily consider git to be documentation.
Hello @DavidoZ
why don't you try the provided example?
Strictly Serial.begin() isn't needed in setup() as M5.begin() already takes care of that. And for the communication with the SIM7600 you'll need to open Serial2. See above example.
Thanks
Felix
Hello @thkfighter
if you're asking whether there are people using M5Stack Basic Core successfully with UIFlow then the answer is yes and no. I am sure there are many successful cases out there but there probably are some unsuccessful cases as well. For M5Stack Basic Core resetting every few seconds many reasons come to mind: weak power supply, UIFlow firmware not properly burned, incorrect UIFlow firmware, WiFi credentials incorrect, weak WiFi signal and yes, faulty hardware.
Without a little more information it is very hard to diagnose the particular issue your M5Stack Basic Core is suffering from. Could you give a little more information? For instance is there anything in M5Burner log? Is there anything on the screen? If yes, does the WiFi symbol turn from red to green?
Thanks
Felix
Hello @alexylem
only so called RTC_GPIOs can wake ESP32 from deep sleep. Unfortunately GPIO_NUM_5 is not one of them.
Please check out page 15 - Pin description of the ESP32 datasheet.
Thanks
Felix
Hello guys
there is a new version, M5Paper V1.1, available in the M5Stack store. It seems to be more or less identical with the original version, maybe except for the e-Ink screen panel?
Does anyone understand below comment from the M5Paper product description?
'M5Paper v1.1 adopts flexible e-Ink screen panel, which is the same model as that of M5Paper v1.0 hard e-Ink screen panel. All features and specs are the same for both models.'
Is the new and old version actually the same or not? And what is the difference between a flexible and a hard e-Ink screen panel?
Thanks
Felix
Hello Wold101,
Thanks for your answer.
I need to continue to use the M5Stack Core as I have made some backplane electronics and need to use the M5Stack stock.
I didn't know about this post and I already used a diode and had a bug with the ESP. Probably this problem of low battery charge.
The idea is great to use a MAX40200 but it requires extra wiring.
I tried with a capacitor. I have some 4700µf in stock at 63V.
I like this solution, no modification and it works well.
I will test it over several days.
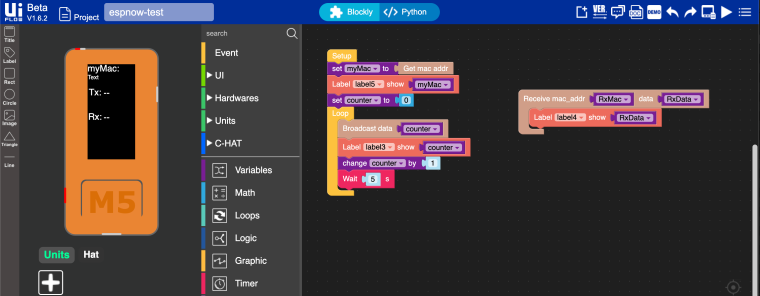
I use this code in stickc as esp receiver for debug. And on other atom lite i use only broadcast datablock with convert to str block with my message. And its works.
[image: 1619283750745-block.jpeg]
@m5stack thnx, I solved this problem - indeed I had to load board definitions
Also this YT-video 'M5Paper Seasons Greetings Display' was helpful: https://youtu.be/Tjz4fGRn8fo
When you install UIFlow and finish setting up the wifi, the API key will be displayed on the screen along with the mode and the network you have connected the device to.
As mentioned in the other thread, the missing step is transferring the canvas framebuffer to the EPD.
If your loop function is changed as below, it works as you expect.
void loop() {
for (int i=1; i<7; i++)
{
canvas1.drawString(testString[i],20,20);
/* m5epd_err_t UpdateArea(uint16_t x, uint16_t y, uint16_t w, uint16_t h, m5epd_update_mode_t mode); */
M5.EPD.WriteFullGram4bpp((uint8_t*)canvas1.frameBuffer());
M5.EPD.UpdateArea(0,0,100,100,UPDATE_MODE_GL16);
delay(1000);
}
}